Wednesday, October 27, 2010

Managing Samba (Part 6 of 6): Remote GUI tools

While there are many tasks that can be performed from a command line, we no longer live in the Dark Ages, back when there were no graphical user interfaces (GUIs). There are graphical tools that can be used to manage Samba across a large corporate network. This tip addresses that subject. Are you ready?

Where eagles soar

Explore remote management options, and you'll find that neither free nor commercial Windows network management tools suit all IT shops' needs. There are no silver bullets. If your goal is to find a universal network management tool that will permit you to meet all site needs, no matter what, the news is not too bright.

While your thoughts may have been to soar with the eagles, you may have to content yourself with a more mundane solution. On the other hand, if your objective is to find a tool that may save a little hassle and make it possible for you to delegate some tasks to departmental managers, there is some good news.

Basic management tools

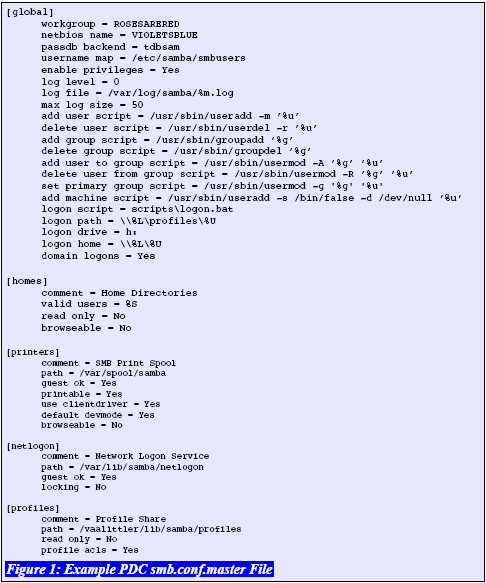
The Samba PDC (primary domain controller) configuration that was used in the last tip is rather simple. It uses the tdbsam binary database in which to store the SambaSAMAccount information.

The tdbsam passdb backend is unsuitable for use with a backup domain controller (BDC). Unix user and group accounts must be resolvable either from the /etc/passwd and /etc/group system account files or via the name service switcher (NSS) facility.

The fact that tdbsam does not permit operation of the PDC with a BDC means that this back end is limited to those sites that either have few users or many potential users at one location. The largest site I know that uses the tdbsam back end has 4,500 users. This back end can be used where the network is multi-segmented, but then fast WAN bandwidth is essential; otherwise, the infrastructure would collapse as a result of network logon failures.

With these provisos out of the way, let's consider remote network administration needs. Where this type of network configuration is in use, the most likely need is to permit delegation of the ability to join workstations to the network as well as user and group accounts. If care and attention is given to the design of file storage layout, it may not be necessary for departmental or divisional managers to create, delete or change share configurations.

In this situation, the Windows NT4 Domain User Manager will most likely be a sufficient tool for remote network management of users and groups. The NT4 Domain Server Manager, or the MMC Computer Management Console, could be used to administer shares and computers.

The NT4 Domain User Manager

In Figure 1, the Domain User Manager could be used to make Alex Monteiro a member of an additional group. It can also be used to change the primary group he belongs to. This is an example of a user account change.

Figure 1: Changing group membership


Figure 2 demonstrates the ability, using the NT4 Domain User Manager, to change the users who are members of a particular group.

Figure 2: Manipulation of group membership


It is increasingly necessary to limit user network access times and days. Figure 3 illustrates the capability to do this using the Windows NT4 Domain User Manager. This screen is accessed by clicking on the user account that must be managed.

Figure 3: Setting network access time limits


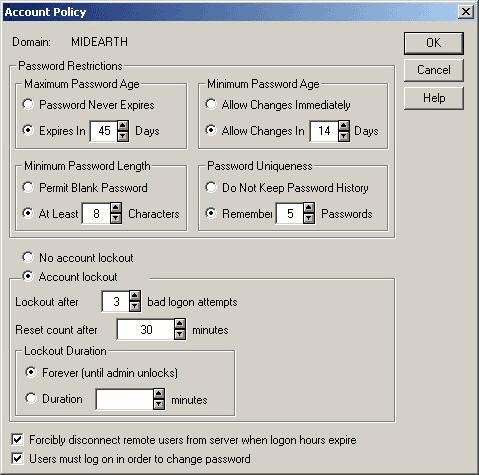
Domain access policies can also be set using the NT4 Domain User Manager. An example of policy setting is shown in Figure 4.

Figure 4: Domain access policy setting


Using the NT4 Domain Server Manager

The NT4 Domain Server Manager can be used to manage domain computer accounts, access controls on shares (share level ACLs) and to create shares. The example shown in Figure 5 demonstrates the settings of share level ACLs. In NT4, this is referred to as the setting of Share Permissions. The Share Permissions configuration acts as a filter that controls who can connect to the share. This ACL information is stored in the Samba file /var/lib/samba/share_info.tdb; it is not set in the smb.conf file.

Figure 5: Managing Share Permissions (ACLs)


A share can also be created using this tool. For that operation to work, the smb.conf file must define the script that should be called to add, change or delete a share. Example scripts are provided in the Samba source code tarball in the examples/scripts/share directory.

Figure 6 demonstrates the use of the NT4 Server Manager tool to create a new share. The example scripts that are included with Samba-3 DO NOT automatically create the new directory; that is a responsibility the administrator must take care of either before or after creating the share.

Figure 6: Adding a new share


The Windows XP MMC Computer Management Console

The Windows 2000/XP Professional MMC Computer Management Console can be used to manage share level ACLs as well as file system permission settings. This use of this tool to create a new share is shown in Figure 7.

Figure 7: Use of the MMC Console to create a new share


In Figures 6 and 7, it should be noted that the Samba UNIX path must be entered using Windows file system semantics. The path c:\data\archive\ will be automatically converted to the Unix semantics /data/archive/.

So far, it has been demonstrated that a Samba domain can be managed using the NT4 Domain User Manager and the NT4 Domain Server Manager. At this time, it is necessary to point out that these tools have their limitations when used from Windows 2000 or Windows XP Professional. That limitation is brought about because Microsoft has changed the underlying remote procedure call architecture in these products so that these tools can no longer be used to manage user rights and privileges from the later generation Windows platforms.

The NT4 Domain Management tools can be obtained from Microsoft's Web site. Just search for SRVTOOLS.EXE, download them and execute the file in the directory in which you want them to be installed.

There exists an equivalent tool called the Nessus Toolkit that can be installed on a Windows 9x/Me client. This tool can be used to manage all settings including user rights and privileges.

The NT4 Domain User Manager and the NT4 Domain Server Manager can be used, regardless of the passdb backend that Samba is using. However, sites that are using an LDAP directory to store and manage network users and groups will almost certainly desire an LDAP directory management tools that more succinctly manages the LDAP directory.

Administrative tool preferences are particularly personal. I have met administrators who prefer to use Webmin to manage the Samba configuration, user and group management.

There do not seem to be many today who make use of Samba's SWAT (Samba Web Administration Tool). SWAT was originally developed for the Samba-2 series.

LDAP Directory Managers

Just mentioning an LDAP directory browser is often enough to evoke a reaction. That is really just too bad, because directory browsers serve a very useful purpose, particularly for those who have a profound appreciation for the power they offer. Admittedly, not all LDAP browsers are created equally!

You may wish to check out the full range of open source offerings, or you may simply prefer to purchase a commercial tool set; the choice is yours. The following are LDAP directory browsing tools I find useful:


Name                                            Source URL                                               OS Platform   Language
LDAP Browser http://www-unix.mcs.anl.gov/~gawor/ldap/download.html Any                  Java
LDAP Admin         http://ldapadmin.sourceforge.net/                                         Win32  Native EXE
phpldapadmin         http://phpldapadmin.sourceforge.net/                               Web server PHP
Directory Administrator http://diradmin.open-it.org/                                      Linux + BSD   C
GQ                         http://sourceforge.net/projects/gqclient                              Linux + BSD   C

Of the above, it would appear that GQ and Directory Administrator are no longer actively maintained. GQ is current in its architecture, but Directory Administrator does not fully support recent releases of OpenLDAP. The other tools are currently active projects.

There are many other choices in LDAP directory browsers. But as useful as they are to the administrator who manages LDAP directories that span a complex array of services and purposes, the use of a more work-flow or task-oriented tool is often preferred.

There are three tools that outshine the rest where it pertains to managing a Samba-3+ LDAP environment:


Name                                                   Source URL                          OS Platform          Language
LAM (LDAP Account Manager)     http://lam.sourceforge.net/            Web server              PHP
IMC (Idealx Management Console)    http://imc.sourceforge.net/            Web server              Perl

The LDAP Browser can be used to view and edit directory information, as is shown in Figure 8. The LDAP Browser lacks the facility to perform standard account operations without exposing information that a human resources manager or a departmental head would not need to know.

Figure 8: LDAP Browser showing a user account


Compared to the LDAP Browser, the LDAP Admin tool for MS Windows skillfully bridges both worlds. It looks and feels like LDAP Browser, but has added utilities that are more task-focused. Figure 9 provides a basic overview of what this tool looks like; but in Figure 10 you can see how it adds the nice touch of removing the complexity of having to deal with specific LDAP entities when adding a user account. It has this same smart touch for all management tasks.

Figure 9: LDAP admin basic view


Figure 10: LDAP admin create new user account


Although these tools look neat, they are oriented towards the more technically-competent directory administrator. There are a few tools that are designed to remove the appearance of being for the LDAP guru and that have a stronger task orientation. One example is LAM, the LDAP Account Manager. An example showing a partial list of users is given in Figure 11.

Figure 11: LDAP account manager user list


On the other hand, if you are using Samba-3 + LDAP, and have chosen to use the Idealx smbldap, Perl-based scripts, to permit Samba to interface to with the LDAP directory, you may choose to use the Idealx Management Console with the SambaConsole plug-in. Figure 12 presents a typical IMC console.

Figure 12: IMC user account console


Commercial utilities

It is good to see the number of companies that are providing tools and utilities to ease and facilitate the deployment and management of Samba-3. If your interest is in finding commercially-supported and/or commercial tools, check the Samba Website's vendors section and the GUI section.

Looking for more tools of convenience? Check out the following Web sites: QCD Interstructures; Vintela; and Centeris.

Conclusion

A detailed overview has been provided demonstrating how Samba-3 can form part of a fully integrated network management infrastructure. The series of articles now completed has shown how Samba-3 user and groups and Windows clients can be fully integrated. The documentation explained how security identifiers are handled across the disparate platforms, how user rights and privileges are implemented using Samba-3, the use of basic command-line management and configuration tools, how to create a basic smb.conf file for a PDC and how it is possible to manage the whole show using some simple as well as sophisticated GUI tools. Enjoy!

Managing Samba (Part 5 of 6): Configuration with the net utility, part two

In part one of this Samba-3 Management tip, we prepared for the big act. Now, the excitement begins. We're ready to use the net utility in the final steps in configuration of the primary domain controller.

Up to this point, no user account has been granted Windows network administrative rights and privileges. Our objective is to give the account mstone full administrative rights. This is simply achieved by making mstone a member of the Linux managersgroup. The managers group is mapped to the Windows Domain Admins group. However, life is not that simple. By default, the Domain Admin group has not rights other than to assign rights and privileges. This means that specific privileges must be assigned even to the Domain Admins group.

Create an administrative user account

Let's verify that mstone is a member of the managers group within the Linux environment:

root#> id mstone
uid=1001(mstone) gid=100(users) groups=100(users),1001(managers)


Now we must demonstrate that within Samba mstone is a member of the Domain Admins group:

root#> net rpc group members "Domain Admins" -S violetsblue -Umstone%n3v3r2l8
ROSESARERED\mstone


Good, mstone is a member of the Windows Domain Admins group. This is achieved by way of the mapping we established by executing:

root#> net groupmap modify ntgroup="Domain Admins" unixgroup=managers

Assign rights and privileges to the domain admins group

In this step, the Domain Admins group is assigned (given, or granted) all administrative rights:

root#> net rpc rights grant "Domain Admins" \
SeMachineAccountPrivilege \
SeTakeOwnershipPrivilege \
SeBackupPrivilege \
SeRestorePrivilege \
SeRemoteShutdownPrivilege \
SePrintOperatorPrivilege \
SeAddUsersPrivilege \
SeDiskOperatorPrivilege -S violetsblue -Umstone%n3v3r2l8
Successfully granted rights.


Make the PDC a domain member

The next step is to make our PDC a member of its own domain. This step requires domain administrative privilege which mstone has. Execute the following:

root#> net rpc join -Umstone%n3v3r2l8
Joined domain ROSESARERED


It is a good practice to validate every step, as we have done so far. The domain trust account that was created by joining the domain can appear to proceed correctly, but it may not work. This can be checked simply by executing:

root#> net rpc testjoin
Join to 'ROSESARERED' is OK


Let's run a further check to see obtain the status of the domain environment:

root#> net rpc info -S violetsblue
Domain Name: ROSESARERED
Domain SID: S-1-5-21-3169455399-2908770435-3209857667
Sequence number: 1135058837
Num users: 2
Num domain groups: 4
Num local groups: 0


So far, so good!

Create additional users

So far, the net command has been used to:

  • map Linux groups to Windows groups;
  • check Windows group membership;
  • join the PDC to its own domain;
  • validate the domain account (join); and,
  • check domain information (note: not dependent on the join).

In the last step, we confirmed that there are only two Windows user accounts and four Windows group accounts.

Let's add accounts for the users misty, jable, dstornton using the remote management net tool:

root#> net rpc user add misty -S violetsblue -Umstone%n3v3r2l8
root#> net rpc user add jable -S violetsblue -Umstone%n3v3r2l8
root#> net rpc user add dstornton -S violetsblue -Umstone%n3v3r2l8


The use of the net rpc group add facility results in Samba calling the add user script to add the account to the Linux account database (/etc/passwd), followed by addition to the passdb backend (tdbsam) specified in the smb.conf file.

Unfortunately, these accounts do not yet have a password. We must rectify that at once:

root#> net rpc password misty secretpw1 -S violetsblue -Umstone%n3v3r2l8
root#> net rpc password jable secretpw2 -S violetsblue -Umstone%n3v3r2l8
root#> net rpc password dstornton secretpw3 -S violetsblue -Umstone%n3v3r2l8


If the password secretpw1 is not added to the command line, this tool will prompt for the password to be entered. It looks like this:

root#> net rpc password misty -S violetsblue -Umstone%n3v3r2l8 
Enter new password for misty: XXXXXXXX

Now let's add misty to the group scientists:

root#> net rpc group addmem scientists misty -S violetsblue -Umstone%n3v3r2l8

It is possible to add the other new members. We can add a new group called warriors by executing this command:

root#> net rpc group add warriors -S violetsblue -Umstone%n3v3r2l8

Let's add misty so she will be a member of the new warriors group:

root#> net rpc group addmem warriors misty -S violetsblue -Umstone%n3v3r2l8

To remove misty from the warriors group, just use the delmem operator, as shown here:

root#> net rpc group delmem warriors misty -S violetsblue -Umstone%n3v3r2l8

Assign user rights

Often, it is necessary to give a user certain limited administrative privileges. An example is making it possible for a normal user to manage printing operations. In this case misty is assigned the printer management capabilities:

root#> net rpc rights grant "ROSESARERED\misty" SePrintOperatorPrivilege \
-S violetsblue -Umstone%n3v3r2l8


Assigned rights can be examined as shown here:

root#> net rpc rights list accounts -S violetsblue -Umstone%n3v3r2l8
BUILTIN\Print Operators
No privileges assigned
BUILTIN\Account Operators
No privileges assigned
ROSESARERED\Domain Admins
SeMachineAccountPrivilege
SeTakeOwnershipPrivilege
SeBackupPrivilege
SeRestorePrivilege
SeRemoteShutdownPrivilege
SePrintOperatorPrivilege
SeAddUsersPrivilege
SeDiskOperatorPrivilege
BUILTIN\Backup Operators
No privileges assigned
BUILTIN\Server Operators
No privileges assigned
ROSESARERED\misty
SePrintOperatorPrivilege
BUILTIN\Administrators
No privileges assigned
Everyone
No privileges assigned


Wrapping up

The net utility permits very extensive remote management of a Samba server. So far, I have demonstrated how this tool can be used to join a Samba server to its domain, add/delete/change user and group accounts, map Linux groups to Windows groups, add users to groups, and so on. The use of this tool to assign rights and privileges has also been briefly touched upon.

The use of this command is well documented in The Official Samba-3 HOWTO and Reference Guide in chapter 12. The latest version of this document is available from Samba.org. This document is also available from Amazon.com in hard copy under ISBN No: 0131882228.

The series continues

This is the fifth article in my Managing Samba series. Articles in this series have so far explained:

  • Windows network identity basics and their use in Samba-3;
  • Windows NT/200x user rights and privileges in Samba 3.0.11 and later;
  • Domain control parameters and operating system interface scripts in the Samba smb.conf file.
  • The pdbedit utility to manage domain and user account policy settings.

The next article will deal with remote GUI management tools and facilities. It will review various GUI tools that can be used to facilitate network management. Of course, some will quickly point out that if this can be made simple enough, it should be possible to delegate many day-to-day operations to senior user staff and thus reduce the cost of keeping the network operational.

Managing Samba (Part 5 of 6): Configuration with the net utility, part one

The net utility plays a key role in completing the configuration of a Samba-3 domain controller or activating and managing a Samba-3 domain member server.

This tip discusses the practical use of the net command. It can be used for initial configuration as well as for on-going system maintenance of Samba-3 domain security environments. My key objective is to demonstrate the assignment and use of network administration tasks using a non-root account. This capability was first available with Samba-3.0.11 and is surely ready for prime-time use. The examples shown here provide the key to safe deployment of Samba using samba-3.0.21.

Pre-flight check

Before launching into the use of the net utility, it is best to quickly check that you have installed a valid smb.conf.master file. A modified version of the file I used previously is shown in Figure 1. This file can be converted into the operational smb.conf file by executing:

root#> testparm -s smb.conf.master > /etc/samba/smb.conf

Always check the validity of the file before starting Samba. The recommended way to do this is by executing:

root#> testparm
Load smb config files from /etc/samba/smb.conf
Processing section "[homes]"
Processing section "[printers]"
Processing section "[netlogon]"
Processing section "[profiles]"
Loaded services file OK.
Server role: ROLE_DOMAIN_PDC
Press enter to see a dump of your service definitions
...


Before starting Samba, it is a good idea to check that there are no tdb files on the system and that may be a left-over from a previous execution of the smbd and nmbd deamons.


Samba-3 will create tdb files in the following directories:

Red Hat Linux: /etc/samba, /var/cache/samba

Never remove the tdb files from a working Samba server unless you really do know what you are doing. The /etc/samba/secrets.tdb file contains essential security data that includes the domain SID. The /etc/samba/passdb.tdb file contains the SambaSAMAccount information. Our example network uses the passdb backend = tdbsam method of storing Windows network account information.

You can remove old Samba run-time files after first stopping the nmbd and smbd daemons by executing:

Red Hat Linux:

root#> service smb stop && service nmb stop
root#> rm /etc/samba/*tdb /var/cache/samba/*


Start the Samba smbd and nmbd daemons using the appropriate method for your Linux platform. On a Red Hat Linux execute:

root#> service nmb start && service smb start

Sites that use an LDAP directory to store all account information require more detailed configurations that are beyond the scope of this article series; however, the net command can be used in the same manner as is described below. This tool is independent of the account back end and simply calls the scripts that are specified in the smb.conf file for all host environment dependent operations.

There are yet a few more things that must be completed before your start can move on. The objective of this series of tips is to end up with a working Samba domain controller. This requires the creation of user and group accounts on the PDC. There are two sides to these accounts: the Linux system account; and the SambaSAMAccount.

The first article in this series described the relationship between the system account and the Windows networking accounts (or SambaSAMAccounts).

The last tip in this series, which covered pdbedit, stepped through the account creation process. If you followed each step, your system should now have a number of Linux user and group accounts, each of which has been configured to have an equivalent Windows networking account.

So that all steps are covered in this tip, I will briefly, and without explanation, create the accounts that are necessary for the use of the net command. The steps that are necessary for this are shown in Figure 2.

Note: Some Linux distributions do not permit addition of a user (machine) account with the home directory specified as /dev/null. If your platform is one of these it will be necessary to change the add machine script parameter in the smb.conf file to use a permitted value.


All right! You've laid the foundation. Now, in part two of this tip, we'll get down to the final steps in configuration of the primary domain controller.

Managing Samba (Part 4 of 6): The pdbedit utility, part 2

The pdbedit tool in Samba-3 is the only one that can manage account security and policy settings. As it was said in part one of this tip, having control of account security and policy settings is important to businesses that must comply with the Sarbanes-Oxley Act of 2002. Now, I'll show you how to put pdbedit to work creating Linux system user and group accounts; assembling Windows group accounts, thus mapping Windows group accounts to Linux group accounts; adding Windows user accounts; and establishing network access policies and controls.

First, let's get on with the establishment of Linux system user and group accounts.

Two group accounts will be created, one for scientists, and one for managers:

root #> groupadd scientists 
root #> groupadd managers

Two user accounts will be created here: one for Tom Bryant (scientists), and one for Melinda Stone (managers). Both users require a home directory. The following steps will create these accounts:

root #> useradd -m -c "Tom Bryant" -G scientists -g users tbryant
root #> passwd tbryant
New Password: XXXXXXX
Re-enter New Password: XXXXXXX
root #> useradd -m -c "Melinda Stone" -G managers -g users mstone
root #> passwd mstone
New Password: XXXXXXX
Re-enter New Password: XXXXXXX


Both accounts are specifically created to be primary members of the users group, and secondary members of the respective groups to which they also belong.

Creation of Windows group accounts

Linux group accounts must now be mapped to Windows group accounts. The following commands will map the key Windows domain groups to local Linux system accounts:

root #> net groupmap modify ntgroup="Domain Admins" unixgroup=managers
root #> net groupmap modify ntgroup="Domain Users" unixgroup=users
root #> net groupmap modify ntgroup="Domain Guests" unixgroup=nobody


The next commands will create Windows groups that will match the Linux group accounts:

root #> net groupmap create ntgroup="Scientists" unixgroup=scientists type d


Addition of Windows user accounts

The following steps create the SambaSAMAccount entries in the passdb backend that was chosen in the last article (tdbsam). The use of the pdbedit tool will demonstrate the account information that can be managed.

root #> pdbedit -a tbryant
new password: XXXXXXX
retype new password: XXXXXXX
root #> pdbedit -a mstone
new password: XXXXXXX
retype new password: XXXXXXX


Both accounts have now been added. This is demonstrated here:

root #> pdbedit -Lw
tbryant:6001:0E74DBD7B1C3CC88AAD3B435B51404EE:72BBEAA844F6E0E9CE546CE7E61C963F:[U ]:LCT-439530A0:
mstone:6002:744F505BEE319723AAD3B435B51404EE:5F7D844D278CD6898B4022AE766CCA1A:[U ]:LCT-43953197:


SambaSAMAccount information can be displayed using the pdbedit tool:

root #> pdbedit -Lv tbryant 
Unix username: tbyrant 
NT username: 
Account Flags: [U ] 
User SID: S-1-5-21-726309263-6128913605-1168186429-13000 
Primary Group SID: S-1-5-21-726309263-6128913605-1168186429-1201 
Full Name: 
Home Directory: \\violetsblue\tbryant 
HomeDir Drive: H: 
Logon Script: scripts\logon.bat 
Profile Path: \\violetsblue\profiles\tbryant 
Domain: ROSESARERED 
Account desc: 
Workstations: 
Munged dial: 
Logon time: 0 
Logoff time: Mon, 18 Jan 2038 20:14:07 MST 
Kickoff time: Mon, 18 Jan 2038 20:14:07 MST 
Password last set: Mon, 05 Dec 2005 23:37:11 MST 
Password can change: Wed, 07 Dec 2005 23:37:11 MST 
Password must change: Thu, 19 Jan 2006 23:37:11 MST 
Last bad password : 0 
Bad password count : 0 
Logon hours : FFFFFFFFFFFFFFFFFFFFFFFFFFFFFFFFFFFFFFFFFF

The use of the tdbsam backend account database makes it possible to override any of these settings.

Had the smbpasswd backend database been used, it would not be possible to change these settings, because this database does not store the advanced attributes of the SambaSAMAccount data structure.

It is possible to set a forced password change for just one user in the following:

root #> pdbedit --pwd-must-change-time="2006-01-31" \ 
--time-format="%Y-%m-%d" tbryant 
Unix username: tbryant 
... 
Password last set: Mon, 05 Dec 2005 23:37:11 MST 
Password can change: Wed, 07 Dec 2005 23:37:11 MST 
Password must change: Tue, 31 Jan 2006 00:00:00 MST 
...

In many cases, it is more desirable to create a global network access policy than to be required to set each account separately. The global setting must be in place before user accounts are created, otherwise the old settings will continue to be used. The per-user settings override the global settings.

In the following example, a global policy will be implemented. The policies that can be set include:

  • min password length
  • password history
  • user must logon to change password
  • maximum password age
  • minimum password age
  • lockout duration
  • reset count minutes
  • bad lockout attempt
  • disconnect time
  • refuse machine password change

In our example,  stringent Sarbanes-Oxley compliance settings will be implemented.

root #> pdbedit -P "min password length" -C 8
description: Minimal password length (default: 5)
account policy "min password length" value was: 5
account policy "min password length" value is now: 8


The policy was set to eight characters. Security conscious sites may want to set this to 14 characters:

root #> pdbedit -P "password history" -C 5
Length of Password History Entries (default: 0 => off)
account policy "password history" value was: 5
account policy "password history" value is now: 5


In the example above, the last five passwords will be remembered. This means that an old password can be reused only after six unique passwords have already been used. We want a minimum password age of 45 days (3888000 seconds).

root #> pdbedit -P "minimum password age" -C 3888000
description: Minimal password age, in seconds (default: 0 => allow immediate password change)
account policy "minimum password age" value was: -1
account policy "minimum password age" value is now: 3888000


A password can be changed only after 45 days:

root #> pdbedit -P "maximum password age" -C 3888000
account policy "maximum password age" description: Maximum password age, in seconds (default: -1 => never expire passwords)
account policy "maximum password age" value was: -1
account policy "maximum password age" value is now: 3888000


Passwords must be changed every 45 days. This means that an old password can be re-used only after 270 days. If the minimum password age is left at the default, a smart user can simply enter six new passwords and then reset the original password in rapid succession, thereby defeating the controls.

root #> pdbedit -P "bad lockout attempt" -C 3
description: Lockout users after bad logon attempts (default: 0 => off)
account policy "bad lockout attempt" value was: 0
account policy "bad lockout attempt" value is now: 3


The setting above ensures that the user account will be locked out after three failed logon attempts. This is an important means by which password cracking attempts may be thwarted.

Where an LDAP password back end is used, the policy settings must be exported to the LDAP directory. This can be done by executing:

root #> pdbedit -y -i tdbsam -e ldapsam

It must be noted that the full capabilities mentioned in this article were stabilized in the Samba-3.0.21 release. Where Sarbanes-Oxley compliance is required please use the most recently released stable version.

The use of the Samba pdbedit tool has been shown to be a simple matter. Once you have mastered it, you'll be ready to move on to the next phase of mastering Samba management: the practical use of the net command, both for initiation configuration as well as for on-going system maintenance. That's the topic of the next episode in the Managing Samba series.

Managing Samba (Part 4 of 6): The pdbedit utility, part 1

Administrators who want to make the most of Samba-3 need to know their PDCs (Primary Domain Controllers) . If you're migrating from Windows to Linux, or remotely managing Samba-3, knowing how to prepare and use Samba-3 PDC is a must.

Remote management of Samba is easily enabled by use of appropriate configuration settings. To achieve proper usage, you have to prepare the Samba-3 PDC for use. This article discusses the first steps, those that involve the pdbedit command. Detailed examples will be provided to demonstrate how this tool can be used to set password expiration limits, reconfigure the location of a users home folder, the location of the users roaming profile, and so on.

Additionally, the article will explain how to disable roaming profiles for all or some users, and will provide guidelines for Microsoft (MS) Windows workstation configuration to bring sanity to network management.

Before we get started, let us consider again some key facts regarding the way the Samba integrates with the server operating system that is hosting it.

Samba interaction with the host operating system

A few simple facts must be stated. There are many postings to the Samba mailing lists in which the author is perplexed that certain commands have failed to produce the behavior that was expected.

Samba implements MS Windows file and print services without overriding Linux system security. What does this mean? It means that:

  • MS Windows users and groups must map to local operating system UIDs and GIDs.
  • Therefore, Samba does not create Linux (POSIX) user and group accounts, but passes this responsibility off to interface scripts.
  • All file system access is limited by the normal Linux security constraints that apply to the mapped UID/GID information. Where in the smb.conf file share stanza parameters are specified to force a particular action. For example: force user, force group, force create mode, etc. Basic Linux file system access controls remain in effect.
  • Samba tools and utilities do not interfere with Linux system administration. The tools never add user or group accounts, and that is why the administrator can specify scripts for all such operations. If the scripts are not specified in the smb.conf file, Samba will reject an attempt to add a use for which there exists no POSIX (system) account. Samba tools do not interfere with file and directory access controls.
  • Because Samba must deal with the semantics that are used by MS Windows networking, it provides a method by which network access can be controlled. The pdbedit tool is the primary command-line tool by which these control may be affected.


The pdbedit tool

The pdbedit tool can only be used by root. It is used to manage the passdb backend, and domain-wide account policy settings. In general, pdbedit can be used to:

  • list user and group accounts
  • migrate user, machine and group accounts
  • manage account policies
  • manage domain access policy settings

Under the terms of the Sarbanes-Oxley Act of 2002, American businesses and organizations are mandated to implement a series of internal controls and procedures to communicate, store and protect financial data. This legislation has far-reaching implications, with respect to the following issues:

  • who has access to information systems that store financial data
  • how personal and financial information is treated among employees and business partners
  • how security vulnerabilities are managed
  • security- and patch-level maintenance for all information systems
  • how information systems changes are documented and tracked
  • how information access controls are implemented and managed
  • audit ability of all information systems in respect of change and security
  • disciplinary procedures and controls to ensure privacy.

In short, the Sarbanes-Oxley Act of 2002 is an instrument of law that demands accountability in regards to business-related information systems, so as to ensure the compliance of all information systems that are used to store personal information and, particularly, for financial records processing. Similar accountabilities are being demanded around the world.

The need to be familiar with the Samba tools and facilities that permit information systems operation compliance with government laws and regulations is clear to all. The pdbedit utility is currently the only Samba command line-driven tool that provides the capacity to manage account, systems access controls and policies. During the remaining life-cycle of the Samba-3 series, it is possible the new tools may be implemented to aid in this important area.

The pdbedit tool is the lone device that can manage account security and policy settings. It is capable of superset of the old Samba smbpasswd capabilities. One particularly important purpose of the pdbedit, is to allow the migration of account information from one passdb backend to another.

So, let's get down to brass tacks, or brass code. In part two of this tip, I'll show you how to create Linux system user and group accounts; create Windows group accounts; map Windows group accounts to Linux group accounts; add Windows user accounts; and establish network access policies and controls.

Continue to part two of this tip.

Managing Samba (Part 3 of 6): Configuration for remote management, part two

You tasted basic Samba configuration in part one of this tutorial. Now, let's get into something much meatier: Samba PDC (primary domain controller) configuration.

The following smb.conf file contents demonstrate the use of the key parameters as well as a few additional ones required to round out a Samba primary domain controller. The key point to observe is the settings for the interface scripts. The example uses the passdb backend = tdbsam, and this means that this PDC is not -- I repeat, not -- suitable for use with a BDC (backup domain controller).

A PDC that has the configuration file shown in this example is a subset of the configuration that is depicted in the book, Samba-3 by Example, second edition. The extracted example does not make use of WINS (the Windows Internetworking Name Server) for NetBIOS to IP address name resolution and eliminates a few more refinements. In this article, my objective is to demonstrate a more basic configuration. The example file is fully functional, but it lacks some of the bells and whistles that can be used to create a more stable environment. The latter Samba environment can be obtained by carefully following the examples in the book.

The [homes] share is properly called a meta-service and is used to dynamically create a user home folder share from the Unix system account information.

The [printers] share is another example of a meta-service. In this case, it defines the generic Unix directory into which a print job will be spooled until it is ready to be sent to a Unix system printer by way of a standard operating system print command. Where CUPS (the Common Unix Print System) is used, Samba will pass the print job directly via a built-in CUPS library interface.

The permissions on the /var/spool/samba directory should be set by executing:

chmod 1777 /var/spool/samba
chown root /var/spool/samba
chgrp users /var/spool/samba


The [netlogon] share is necessary for domain controller operation. The logon.bat script specified in the smb.conf file must be stored in DOS file format in a directory called scripts inside the /var/lib/samba/netlogon directory.

The [profiles] directory will permit the storage of Windows roaming profiles. The permissions on this directory are important and should be set so that the default group can write to the directory. An example of suitable configuration is:

chown root /var/lib/samba/profiles 
chgrp users /var/lib/samba/profiles 
chmod 2775 /var/lib/samba/profiles

As domain users log onto and then out of the Windows workstations that are domain members, the users profiles will be written automatically to the directory /var/lib/samba/profiles/'username'.

[global] 
workgroup = ROSESARERED 
netbios name = VIOLETSBLUE 
passdb backend = tdbsam 
username map = /etc/samba/smbusers 
enable privileges = Yes 
log level = 0 
log file = /var/log/samba/%m.log 
max log size = 50 
add user script = /usr/sbin/useradd -m '%u' 
delete user script = /usr/sbin/userdel -r '%u' 
add group script = /usr/sbin/groupadd '%g' 
delete group script = /usr/sbin/groupdel '%g' 
add user to group script = /usr/sbin/usermod -G '%g' '%u' 
set primary group script = /usr/sbin/usermod -g '%g' '%u' 
add machine script = /usr/sbin/useradd -s /bin/false -d /dev/null '%u' 
logon script = scripts\logon.bat 
logon path = \\%L\profiles\%U 
logon drive = h: 
logon home = \\%L\%U 
domain logons = Yes

[homes] 
comment = Home Directories 
valid users = %S 
read only = No 
browseable = No


[printers] 
comment = SMB Print Spool 
path = /var/spool/samba 
guest ok = Yes 
printable = Yes 
use clientdriver = Yes 
default devmode = Yes 
browseable = No

[netlogon] 
comment = Network Logon Service 
path = /var/lib/samba/netlogon 
guest ok = Yes 
locking = No


[profiles] 
comment = Profile Share 
path = /var/lib/samba/profiles 
read only = No 
profile acls = Yes


Before starting Samba's smbd and nmbd daemons, the contents of the smb.conf file can be validated by executing testparm. This is a very useful tool to verify that there are no critical errors or typos.

It may be useful to rename smb.conf file to smb.conf.master, and then let the testparm utility generate the smb.conf file by executing:

testparm -s smb.conf.master > smb.conf

The resulting smb.conf file will be fully optimized. Additionally, if there are any significant errors, these will be reported as the file is created.

If all went well, go ahead and start Samba. Check the documentation for your operating system platform for information regarding how to start the smbd and nmbd daemons. Alternatively, refer to chapter 1 of the book, The Official Samba-3 HOWTO and Reference Guide, 2nd Edition, for further Samba start-up information.

Operation of Samba can be validated by executing:

#> smbclient -L localhost -U% 
Domain=[ROSESARERED] OS=[Unix] Server=[Samba 3.0.21] 
Sharename Type Comment 
--------- ---- ------- 
netlogon Disk 
profile Disk 
IPC$ IPC IPC Service (Main Server) 
ADMIN$ IPC IPC Service (Main Server) 
hp940 Printer HP DeskJet 940c 
Cups-PDF Printer Cups-PDF 
Domain=[ROSESARERED] OS=[Unix] Server=[Samba 3.0.21] 
Server Comment 
--------- ------- 
VIOLETBLUE Main Server 
Workgroup Master 
--------- ------- 
ROSESARERED VIOLETBLUE

If you've made it this far, then the Samba server is operative and it should now be possible to administer it remotely. Congratulations!

If you want to keep reading, go to the next article by clicking here.

Managing Samba (Part 3 of 6): Configuration for remote management, part 1

Samba is the bridge between Linux and Microsoft worlds. Samba-3 can help administrators create transparent interoperability of Microsoft Windows client with a Unix or Linux server environment. Even so, seamless interoperability is not easy to achieve, but mastering some Samba configuration tasks helps. So, let's get started with this tutorial on smb.conf.

Use the configuration parameters in the Samba smb.conf configuration control file to permit the transparent management of Samba using tools that are native to the Microsoft Windows environment.

By the way, this is the third installment in a series on Managing Samba. The first article in this series explains how Samba handles Windows security identifiers. The second tip describes user rights and privileges in the Microsoft Windows networking environment.

Anatomy of a Samba configuration

To appreciate the complexity involved in creating transparent interoperability of a Microsoft Windows client with a Unix or Linux environment, open up a system shell on your Samba host server and execute this command:

testparm -sv | more

You will soon discover that there are over 300 parameters that are capable of being set in the smb.conf configuration file. While it may be tempting to discuss every one of them, this is not necessary. Even a complex Samba configuration can usually be accomplished using fewer than 30 specific parameters in the [global] section of the smb.conf file.

The parameters fit into a set of functional categories. The functional categories determine how Samba will interact with Windows networking protocols, how Samba will interact with the underlying Unix file system and how Samba will interface with the host operating system.

In this next section, I'll list some terms that summarize commonlyused configuration parameters.

Base parameters


  • netbios name - sets the machine name (i.e. the computer name). If not set, the name of the host server will be used
  • netbios aliases - can be used to present the Samba server under multiple computer names
  • workgroup - sets the workgroup name (the same as an NT4 domain name)
  • realm - is applicable only when Samba is an Active Directory domain member
  • interfaces - instructs Samba which network interfaces to use -- when used with bind interfaces only = Yes instructs Samba to provide file services (TCP ports 139 or 445) only on the specified interfaces. NetBIOS name resolution services (UDP ports 137 and 138) will work on all interfaces.

Lightweight Directory Access protocol (LDAP) controls

LDAP controls are only necessary when Samba is run as a primary domain controller/backup domain controller (PDC/BDC) combination. Basic mandatory controls when using an LDAP directory to store Samba account credentials include:

  • ldap admin dn - defines the administrative DN needed to write to LDAP
  • ldap suffix - defines the base directory information tree
  • ldap [user,group,machine,idamp] suffix - sets the container in which various accounts records are stored

Logging parameters

The default parameter values are usually adequate and normally used for debugging. Commonly used parameters include:


log level - sets the diagnostic intensity level.

  • Typical values are: 
  • 0 - Record only critical errors 
  • 1 - default 
  • 3 - For debugging simple file system access problems 
  • 5 - For complex system diagnostics 
  • 10 - Permit detailed diagnosis of authentication errors

log file - specifies the name of the log files.

Example: /var/log/samba/%m.log - creates a separate log per client

max log size - sets size limit at which Samba should rotate the log file. The file is renamed to oldfile.log and a new file is created.

System interface scripts

The system interface scripts are called when an external application requires management of host operating system environment information. An external application can be the NT4 Domain User Manager or the Samba net utility. When a Windows client is joined to the domain, the add machine script is called to create the Unix system account that is needed so that the appropriate SambaSAMAccount entry can be created to store the machine trust account information.

Examples of necessary actions include user/group account manipulation, add/edit/delete shares, add/edit/delete printers, call system initialization scripts, etc. The common parameters needed are as follows:


  • Account management: add group script, add machine script, add user script, add user to group script, delete group script, delete user from group script, delete user script, set primary group script, rename user script 
  • Note: Where LDAP is used the scripts specified should be able to manage the directory contents. Where LDAP is not used the normal U system account management tools can be specified. For example: add user scriptl= /usr/bin/useradd -m '%u'.
  • Resource management: add share command, change share command, delete share command, add printer command, delete printer command, abort shutdown script, shutdown script

Samba operating mode parameters

Let's move on to Samba operating mode parameters:


  • domain logons - when set to Yes, Samba will enable the network logon service. This creates the domain control capabilities needed for a PDC/BDC.
  • enable privileges - when set to Yes, enables assignment of rights and privileges. Note: only Samba-3.0.11 and later.
  • logon drive - lets the drive that Windows NT4/200x/XP clients will associate with the execution of network logon scripts. This is the drive to which the home directory will be mounted if net use /home is executed on a Windows client, either in a command shell or from the logon script.
  • logon home - used only by Windows 9x/Me clients.
  • logon script - the logon script that is executed when a user logs onto a domain member client.
  • passdb backend - specifies which backend system Samba will use to store SambaSAMAccount information. The default is smbpasswd, the two common alternatives are tdbsam and ldapsam. Both the ldapsam and the tdbsam types are capable of storing the advanced SambaSAMAccount information. The smbpasswd method is not capable of storing the advanced account information.
  • security - this parameter sets the Samba server mode. Acceptable settings are:
  • user - means Samba is either a standalone server or a domain controller.
  • domain - means Samba is an NT4-style domain member.
  • ads - means Samba is an Active Directory member (uses Kerberos authentication and security, but only as a member -- not as an ADS domain controller.
  • server - means that Samba is not a domain member, but is using an external authentication server. Uses pass-through authentication that has been largely obsolete.
  • domain master - Leave this set at the default value on all systems except a BDC. On a BDC, this parameter must be set to No.

There are many additional parameters that are useful for specific purposes. Refer to the smb.conf online main page for detailed information regarding each parameter.

For the most part, the setting of unnecessary parameters in the smb.conf files is unnecessary and potentially problematic. It is very good advice to keep the smb.conf file as simple as possible.

Now that your appetite is whetted for Samba configuration, I've got a new treat for you. Move on to part two for an example of a Samba PDC configuration. I'm sure you'll find it very satisfying.

Click here to read part two of this tip.

Managing Samba (Part 2 of 6): User rights and privileges

When faced with making Linux and Windows work together securely, system administrators can run into trouble if they don't understand or can't correctly use the administrative security controls that are present in the Microsoft Windows operating system (OS) and the Samba-3 equivalents of those controls.

So, let's take a look at the tools administrators should be familiar with and the rights and privileges that can be managed.

This is part two of  a six-part series, titled Managing Samba. In part one, I covered Windows network identity basics. Stay tuned, as the next article in this series will review the process of establishing a Samba configuration that is able to be securely managed using traditional Windows administrative tools.

Why user rights and privileges matter

Many people get confused by the fact that, by design, Windows NT/2000/XP provides the capacity to restrict access to almost every part of the operating system, yet the facilities that permit files and directories to be secured through use of restrictive access controls are frequently ill-used, if they're used at all.

Microsoft Windows XP Home Edition is commonly configured so that the default user has full administrative privilege and thus bypasses most native operating system security provisions. It is, therefore, no wonder that virus and worm infections can march forward with the utmost pace and force.

Many users expect to have the ability to create accounts and to install software without constraint. My objective is not to discuss the defense mechanisms against virus and worm activity, but to focus on administrative rights and user capabilities.

Windows XP Home Edition does not provide the ability to manage file system access controls. In every respect therefore, the dominant operating system in the consumer market place, Windows XP Home Edition, provides little to no security control capability.

Windows XP Professional provides the capability to manage access control lists (ACLs) on file system resources, but few people learn how to manage them effectively. Despite this, ACLs are a valuable asset in a networked environment and are a common part of Windows security domains. Windows XP Professional also permits the assignment of administrative tasks to users and groups. These facilities are of significant importance in the creation and maintenance of a secure networking environment.

A key reason for the exercise of constraint in corporate networks is the protection of data and, in particular, the protection of confidential data. In the U.S., the Sarbanes-Oxley Act of 2002 is used to enforce restrictive data access in many industries.

Samba-3 is transparent in respect of file system security controls. So long as the underlying file system of the server on which Samba is being hosted has ACL support and, providing that Samba-3 has been compiled to support the handling of ACLs, Windows administrators and users will have the ability to manage ACLs on exported file systems on the Samba-3 server.

Windows domain membership and security

Machine (computer) accounts are used in the Windows NT OS family to store security credentials for domain member servers and workstations. A computer account is created when a Windows client joins a Windows NT4 domain, or when it is made a member of a Microsoft Windows 200x Active Directory domain.

As part of the startup process of a domain member machine, it goes through a validation procedure that includes an exchange of credentials with a domain controller. If the domain member fails to authenticate, using the credentials known for it by domain controllers, the machine will be refused all access by domain servers.

Within the context of a domain logon, the computer account is essential to the way that Microsoft Windows secures authentication. The computer account is used only to authenticate domain member machines during the startup, a security measure designed to block man-in-the-middle attempts to violate network integrity.

Windows Domain Administration Controls

By default, the ability to add machines to the domain is limited to the Windows domain administrator account. The right for other users or groups to add machines to the domain can be granted by the administrator using the appropriate tool.

The Windows NT4 server management tool can be used to manage domain member machines (servers and workstations). The right to add workstations to the Windows NT4 domain can be granted using the Windows NT4 domain user manager. This particular privilege that must be assigned to a user or group so that they can add machines to the domain is called SeMachineAccountPrivilege. The title in the NT4 domain user manager rights management panel is called Add workstations to domain. The list of available privileges that can be assigned in Windows NT4 is shown here:


Additional Windows privileges were added in Windows 2000 and are also available in Windows 2003 and Windows XP Professional. These may be found in Figure 2.


The Windows 200X privileges are a super-set of those available with Windows NT4. Some of the privileges present in the Windows NT4/200X environments are of unique relevance to those operating systems and have no direct equivalent in a UNIX- or Linux-based Samba environment.

The privileges that make sense within a Linux environment have been implemented in Samba-3.0.x since the 3.0.11 release. These are summarized below.


In comparing the privileges that are present in Samba with those supported by Microsoft Windows NT4/2000/2003, those found in Samba are also supported in Windows server products.

Windows administrative privileges can be assigned to Windows users and Windows groups, thereby permitting relatively fine-grained assignment of administrator privileges on an as-needed basis. For example, where it is desirable that a Windows user called joebartemy should be able to add Windows clients to the domain, his account can be assigned the SeMachineAccountPrivilege thus preventing this user from gaining any other administrative capabilities. Likewise, members of the Windows group Marketing Staff can be given the ability to manage printers and print jobs by granting this group the SePrintOperatorPrivilege.

Allocating administrative privileges

Samba versions prior to 3.0.11 required the use of a UNIX account that has UID=0 (the root account) for a number of core administrative operations. Operations that require this level of privilege within the Unix operating system environment include management of user and group accounts, change of file ownership, print job management and so on. Older versions of Samba provided work-around methods to permit some of these essential tasks to be completed. Those that could not be side-stepped simply had to be done by the root account, or its equivalent.

Samba-3.0.11 and later allow the creation and administration of a Samba server without needing to resort to the use of the root account. Users who are members of the Domain Admins group automatically have the necessary privileges to manage all aspects of Samba. Those who need to be assigned specific roles can be given the minimum level of access necessary to perform the tasks they are responsible for. Someone who has been given the SeMachineAccountPrivilege can add machines to the domain and those who have been given the SePrintOperatorPrivilege can now manage printers, print jobs and more.

Management of Windows administrative privileges

Samba-3 provides a command-line tool for the management of user rights and privileges. The use of the net utility, as well as the administration of user rights and privileges are documented in the Samba3-HOWTO book, and correct has also been documented in the Samba3-ByExample book.

An example of use of the net command to assign the ability to add machines -- Samba servers, Windows servers and clients -- to the Samba domain for the domain MIDEARTH and the user jerry is shown here:

net rpc rights grant "MIDEARTH\jerry"
SeMachineAccountPrivilege -S PDC -
Ujtadmin%password


This operation can also be performed by using the Windows NT4 Domain User Manager. This handy utility may be obtained from the Microsoft support Web site. A more recent version of this tool is also available.

An example of use is demonstrated in Figure 4.


The steps that lead up to this Windows panel are:

Log onto Windows XP Professional as a user who has administrative rights.
Launch the UsrMgr.exe.
Click on the Policy tab.
Click on the User Rights entry.


Another tool that can be used to manage user rights is a commercial package called Hyena. The latest at the time of preparation of this article was version 6.5.

The next article in this series will document the configuration of a Samba domain controller so that user rights and privileges can be managed using the tools we have reviewed here.

Managing Samba (Part 1 of 6): Choose your weapon

Samba has become an integral part of a large portion of the networking marketplace. Despite its prevalence, not all IT shops currently utilize the facilities provided to fully secure the network or to drive operating costs to a minimum.

Samba-3 has grown in capability, as well as in complexity. Linux administrators are keen to learn how better to manage Samba and how to meet the growing demand of network security and audit-ability. This series of articles will help administrators master Samba-3 management. In this first article in a six-part, two-month series, you'll find a description of the series and a tutorial on Windows network identity basics.

Introduction

I recently asked a few Windows networking administrators what they believe is needed to help drive down the cost of using Samba. They all said better management tools would be a great help.

After further discussion with these administrators, it became clear that while they were comfortable with Samba, they were unclear where Samba stores user, machine and group information, and how these relate to the network environment. Had the relationships been better understood, the functionality of available administration tools might be better understood and the request for better tools might not be so strong.

This series of articles will provide a better understanding of the relationship between Windows networking accounts and their equivalent on the Unix or Linux server that is running Samba.

I've described the topics in the series below. You can also click here to go directly to page two for the tip on Windows network identity.

Series overview

This series will cover the following subjects:
  • Windows networking identity basics: The first article explores the ways in which Microsoft Windows users gain access to the operating system and how this affects access to network resources. It will also explore what a Samba server must do to handle incoming network connection requests from Windows workstations. Specifically, the article will show how Samba deals with identity issues, where it stores the data it uses and how each component of Windows networking identities can be managed. The article concludes with basic rules that make it possible to operate the Samba environment with a minimum of administrative overhead.
  • A comparison of user rights and privilege management in Windows and Samba: The second article will explain how Windows workstation users gain, or can be denied, various local and network-wide rights and privileges. It then will examine how this can be implemented in a Samba environment.
  • The creation of a network-wide remote management infrastructure: The next article focuses on how Samba can be configured to create an environment that is conducive to centralized network management. It will provide information on where to obtain detailed technical guidance, so that the necessary infrastructure can be implemented without undue difficulty.
  • Use of the pdbedit utility to manage user accounts and to configure network security settings: The pdbedit utility has become a strategically important tool for managing Windows network user accounts. It is also important to sites that need to comply with the requirements of the Sarbanes-Oxley Act. The article will discuss how this tool can be used to set password expiration limits and reconfigure the location of a user's home folder or the location of the user's roaming profile, and so on. Additionally, the article will explain how to disable roaming profiles for all or for some users and will provide guidelines for Windows workstation configuration to bring sanity to network management.
  • The use of the net utility to perform remote network management: The article will show how the net utility can be used to perform many essential network management and control operations. This versatile tool can be used to manage users, groups and group membership for Windows networking users. It can also be used to migrate servers and server resources across various Windows and Samba servers.
  • The use of various remote management tools: This closing article will examine the leading solutions to the remote network management challenge. An overview will be provided covering the NT4 SRVTOOLS, the LDAP administrator, the IMC console, the LDAP Administration Manager (LAM), and a commercial tool (yet to be chosen).
Continue to the next article for the tip, Managing Samba: Windows networking identity basics.

A collection of the top Linux command tips

As a sysadmin, you’ll need to use the command line instead of the GUI from time to time. Do you know how to monitor what’s running on your Linux server through the command line? Can you confidently unlock the copying prowess of the dd command? Brush up on your command-line skills with this collection of expert advice -- a list of the 8 top Linux command tips.

Using grep and sed to find and replace
Using the Linux commands grep and sed can help search for a string of text within a file and replace strings.

Linux/Unix commands: How to get copy, conversion power with dd
The Linux command dd handles convert-and-copy tasks, and aids in cloning the hard drive, among other tasks.

How to manage software on Ubuntu Server with "aptitude" and "apt-get"
In this tip, learn how to use aptitude and apt-get to perform Linux package management.

Keep an eye on Linux processes with ps
By using the command-line tool ps, you can monitor what’s running on your Linux server.

Samba management: Configuration with the net utility, part 1
The first installment of a tip series that explains using the net utility to configure the primary domain controller and manage a server in Samba.

Samba management: Configuration with the net utility, part 2
Part 2 of a tip that explains using the net utility to configure the primary domain controller and manage a server in Samba.

Understanding Linux system performance management using top
Using the Linux command top can provide sysadmins with system performance data. Learn how to analyze these top results, including data such as load average values.

Analyzing Linux write performance problems with iotop
There could be write performance problems on your Linux system, and the iotop Linux command may be more detailed than top in getting to the root of the performance issues.

Be sure to also check out this comprehensive guide to 77 useful Linux commands and utilities, coming soon !!

Analyzing Linux write performance problems with iotop

A common performance problem for servers is writing data. When the server writes too much data, the storage sub-channel isn't able to catch up. But, it can be difficult to discover the performance problems, so here we'll walk through how to analyze performance issues on Linux servers.

The problem with write performance-related issues, is that often they hide behind other parameters. In all cases however, the top command is a good place to start. The wa parameter in the CPU line indicates the amount of time that your system has been waiting for the I/O-channel. Typically, this indicates a slow storage channel.


A high value at the wa parameter indicates that the storage channel is suffering

Just looking at top however is not good enough. Let's have a look at a small test. In this test, we have written the current memory state to disk, using dd if=/dev/kcore of=/kcore.img bs=4096. On a 4 GB machine, that is a lot of work for the machine to do. While performing the job, everything else really slows down, which means there is a performance problem.

But, the problem with top is that it's not really easy to see the write performance problem. It all depends on the amount of CPU cores you have. On a 16-core server, the write problem may claim all CPU cycles on one CPU. You would however not see that from the generic top overview as this gives you the average for all CPU's together. So with a CPU core that is completely claimed by writes, you wouldn't see much more than 6% at the wa parameter in top. To get more detail, the first thing to do, is to press the 1 key in the top interface, which gives you a line for each CPU core. On the test system used for writing this article, there are two cores only, so the results are not spectacular. But, on a multi-core system the differences displayed may be important.


From top, press 1 to see performance details for each CPU core.

So, if only one core out of 16 cores is completely busy waiting for the slow storage channel, then the 15 remaining cores can do the work, right? Too often, the answer is "no." If you just have one storage channel, then all CPU's need to go over that one single channel. If one CPU is completely busy waiting for a storage channel, then the other cores won't be able to get prompt reactions from the storage channel either. So it may look all right from the top window, but performance could be terribly off.

Fortunately, there is iotop and it gives information about the most active processes with regard to I/O. Most Linux distributions don't install it by default, so make sure you install it manually, using your distributions meta package handler (for instance: yum install iotop if you're using RHEL). The good thing about iotop, is that it shows you which is the most active process with regard to I/O at the moment and how much I/O it is generating. If you compare the I/O load caused by this process with the capacity of your storage channel, you'll know immediately if you have a storage problem and if so, where it comes from. Then you can troubleshoot this issue, and optimize your Linux server write performance.


With iotop you can see exactly what process is claiming your valuable resources.

Understanding Linux system performance management using top

If there's something wrong with the performance of your Linux server, chances are that you're already using top to find out what's happening. It seems however that few people really know how to tell what their system is doing from the information that top provides. Here I will explain how to understand the performance data that top provides.

When starting top, make sure that you are in root. To start, open a console on your favorite Linux distribution and enter the top command. The result should look similar to this:

host:~ # top
top - 12:41:34 up 1 day,  3:29,  6 users,  load average: 0.00, 0.00, 0.00
Tasks:  99 total,   1 running,  98 sleeping,   0 stopped,   0 zombie
Cpu(s):  0.1%us,  0.1%sy,  0.0%ni, 99.7%id,  0.1%wa,  0.0%hi,  0.0%si,  0.0%st
Mem:    775064k total,   560056k used,   215008k free,   136216k buffers
Swap:   136544k total,        0k used,   136544k free,   275624k cached
   PID USER      PR  NI  VIRT  RES  SHR S %CPU %MEM    TIME+  COMMAND
 8830 root      15   0  2232  936  692 R    2  0.1   0:00.03 top
       1 root   16   0   728  284  244 S    0  0.0   0:01.25 init
       2 root   RT   0      0       0      0 S    0  0.0   0:00.10 migration/0
       3 root   34  19      0       0      0 S    0  0.0   0:00.34 ksoftirqd/0
       4 root   RT   0      0       0      0 S    0  0.0   0:00.04 migration/1
       5 root   34  19      0       0      0 S    0  0.0   0:00.00 ksoftirqd/1
       6 root   10  -5      0       0      0 S    0  0.0   0:00.33 events/0
       7 root   10  -5      0       0      0 S    0  0.0   0:00.10 events/1
       8 root   11  -5      0       0      0 S    0  0.0   0:00.01 khelper
       9 root   12  -5      0       0      0 S    0  0.0   0:00.00 kthread
      13 root   10  -5      0       0      0 S    0  0.0   0:00.13 kblockd/0
      14 root   10  -5      0       0      0 S    0  0.0   0:00.08 kblockd/1
      15 root   13  -5      0       0      0 S    0  0.0   0:00.00 kacpid
      16 root   13  -5      0       0      0 S    0  0.0   0:00.00 kacpi_notify
     227 root   20   0      0       0      0 S    0  0.0   0:00.00 pdflush
     228 root   15   0      0       0      0 S    0  0.0   0:00.93 pdflush
     229 root   17   0      0       0      0 S    0  0.0   0:00.00 kswapd0


The first part of relevant information that top provides can be found in the first line: the load average parameters. These describe how busy your computer is at the moment. The average workload of your server is always given in three digits. Each represents the load average for the last minute, the last five minutes and the last fifteen minutes. You should always start by interpreting these numbers, as they tell you if your system is overloaded or not.

To understand the load average values, you must relate them to the number of CPU's or CPU cores in your computer. If you're not sure, just press the 1 button when the top interface is active, this will give you a line for each CPU core that is present in your computer. When a CPU core has been completely busy in the last minute, top will show you 1.00 if it's a one core system. If you have eight cores installed in your computer, and one has been completely busy, while the others were doing nothing, top will show you 0.125 as the value in the load average. In order to interpret the value in the load average lines, you need to know the normal value for your server. For instance, on a four-core machine, that would be 4.00. Anything above that value is bad, as it indicates that queuing occurs and processes are waiting for their slice of system time. Anything below this value is good. If your system is getting beyond the ideal value for that system, the next step is to determine what exactly is happening. Listing 2 gives an example of a one-core system that is too busy:

top - 12:49:38 up 1 day,  3:37,  6 users,  load average: 1.37, 0.34, 0.11
Tasks: 101 total,   4 running,  97 sleeping,   0 stopped,   0 zombie
Cpu(s):  7.1%us, 16.7%sy,  0.0%ni,  6.2%id, 67.3%wa,  0.4%hi,  2.4%si,  0.0%st
Mem:    775064k total,   767664k used,     7400k free,   514236k buffers
Swap:   136544k total,        0k used,   136544k free,   102744k cached
   PID USER      PR  NI  VIRT  RES  SHR S %CPU %MEM    TIME+  COMMAND
 8859 root      18   0  1788  524  448 R   46  0.1   0:21.25 cat
 8860 root      18   0  1792  524  448 R   41  0.1   0:18.83 cat
  229 root      15   0     0    0    0 S    9  0.0   0:01.54 kswapd0
 3695 root      16   0  1864  700  616 S    3  0.1   0:16.00 hald-addon-stor
 4580 root      16   0 95916  14m  11m S    3  1.9   0:36.44 main-menu
 4552 root      15   0  101m  24m  17m S    2  3.2   0:13.44 nautilus
   13 root      10  -5     0    0    0 S    1  0.0   0:00.70 kblockd/0
 4270 root      15   0  146m  12m 5716 S    1  1.7   1:01.66 X
 4536 root      15   0 29012 9688 7896 S    1  1.2   0:05.47 gnome-settings-
 4578 root      16   0 18136 5500 4124 S    1  0.7   0:14.87 gnome-power-man
 8861 root      16   0  2236 1036  780 R    1  0.1   0:00.64 top
   14 root      10  -5     0    0    0 S    1  0.0   0:00.49 kblockd/1
 4575 root      15   0 95736  13m  10m S    1  1.8   0:07.39 application-bro
 3131 root      16   0  4692 3244 1444 S    1  0.4   0:34.57 hald
 4586 root      15   0 93868  11m 9796 S    1  1.6   0:06.62 mixer_applet2
  228 root      15   0     0    0    0 S    0  0.0   0:00.95 pdflush


If the workload is getting too high, you need to find out what is happening. To do this, you have to look at the CPU line(s). You will see no less than eight different parameters, and of these, only three really matter. First is the "us" parameter. This indicates the amount of time your system is busy handling requests that were made in user space. If a task is not in user space, it is a high-privileged task that runs in system space, which you can see reflected in the "sy" parameter. In kernel space, processes can communicate directly to the drivers. Therefore, you should worry more if your system gives a high load in system space. The third parameter that is important in the CPU line is "wa." This stands for waiting, and indicates the amount of time your system waits for I/O-devices. A high parameter here indicates a problem on the I/O-channel, normally this is a hard disk that is too slow or a misconfigured network.

The second listing example shows that the system is way too busy waiting for I/O. This is far too common, many times system performance problems are related to slow I/O devices. One solution is to install a faster hard drive, but before doing that, it is a good idea to check the BIOS of your server and see if there are parameters that you can tune. One of the most important candidates for that, is the write cache parameter. By writing data to write cache before writing it to the disk platters themselves, you can dramatically reduce waiting times. Since write cache is about 1,000 times as fast as the hard disk, chances are that you can win a lot by enabling this feature.

Use top to reveal memory efficiency on Linux servers 


Apart from the information on how busy your system's CPU is, top also shows you how memory-efficient your server is. You can find information about this in the lines that start with Mem: and Swap:. Let's start discussing swap. This is RAM that is emulated on the hard drive that your computer should never use. There are some exceptions though: if your server runs Oracle, SAP or any other specific application that is built to use swap. But normally, Linux starts swapping only if it is totally out of normal memory. In an exception, your server could pre-allocate some swap so that it can use it faster if it's needed. But in most cases, you should install new RAM on a server that starts swapping.

After you have verified that your system isn't swapping, you should find out what it is doing with available memory. To understand memory, you should know that Linux uses memory quite efficiently. If there's no real need for memory to service processes, it will be used as read cache or write buffers. The read cache contains files that were recently read from your computer's hard drive. The kernel just keeps them in RAM, because you might need them again and if you do, it's a lot faster to serve these files from RAM than from hard disk. The write buffers on the other hand, are used as a waiting room for your server's hard drive. Instead of offering data directly to the hard drive, the operating system places them in the write buffers where they can wait until the hard disk decides it has time to flush these write buffers (e.g., writes them to disk). This also gives you a performance benefit.

The nice thing about read cache and write buffers is that the operating system can make them available instantaneously when it needs memory. Therefore, you should add the read cache and write buffers to the total amount of available memory. A nice way of doing this, is by using the free -m command. On the +/- buffers/cache line, you can see how much free memory your computer really has.

host:~ # free -m
        total       used       free     shared    buffers     cached
Mem:          756         746          10             0         595         40
-/+ buffers/cache:    110        646
Swap:          133             0        133


As you can see in this listing, at first sight it looks as if this server almost has no more available memory, but if you know that buffers can be flushed immediately, you can see that it has largely enough available memory.

Determining active processes on a Linux server

The last interesting part of top is where it shows the most active process on your server. This is not hard to determine: the most active process is listed first on the process list. If this process uses too much system resources, top offers some options to handle it. You can terminate it by pressing the k-key from the top interface. Top will then ask you what signal you want to send to this process. You should always try signal 15 first, this represents the nice way of asking the process to please stop its activity. If that doesn't work, use signal 9, which just terminates the process without further waiting.

Another way of taming a process, is by "renicing" it – i.e., adjust the priority the process is using. To do this, press the r-key from the top interface. By giving a process a negative nice value, you increase the priority with regard to other processes. By assigning a positive nice value, you give more room for the other processes. The values you can use are between -20 and 19. It's a good idea not to assign the value of -20. By doing this, you would give the highest possible priority to a process, thus allowing it to leave no time for the other processes (if it is a busy process).