OpenSSH is a FREE version of the SSH connectivity tools that technical users of the Internet rely on. Users of telnet, rlogin, and ftp may not realize that their password is transmitted across the Internet unencrypted, but it is. OpenSSH encrypts all traffic (including passwords) to effectively eliminate eavesdropping, connection hijacking, and other attacks. Additionally, OpenSSH provides secure tunneling capabilities and several authentication methods, and supports all SSH protocol versions.
SSH is an awesome powerful tool, there are unlimited possibility when it comes to SSH, here is the my top 25 SSH commands
1) Copy ssh keys to user@host to enable password-less ssh logins
ssh-copy-id user@host
To generate the keys use the command ssh-keygen
2) Start a tunnel from some machine’s port 80 to your local post 2001
ssh -N -L2001:localhost:80 somemachine
Now you can acces the website by going to http://localhost:2001/
3) Output your microphone to a remote computer’s speaker
dd if=/dev/dsp | ssh -c arcfour -C username@host dd of=/dev/dsp
This will output the sound from your microphone port to the ssh target computer’s speaker port. The sound quality is very bad, so you will hear a lot of hissing.
4) Compare a remote file with a local file
ssh user@host cat /path/to/remotefile | diff /path/to/localfile -
Useful for checking if there are differences between local and remote files.
5) Mount folder/filesystem through SSH
sshfs name@server:/path/to/folder /path/to/mount/point
Install SSHFS from http://fuse.sourceforge.net/sshfs.html. This will allow you to mount a folder secure over a network.
6) SSH connection through host in the middle
ssh -t reachable_host ssh unreachable_host
Unreachable_host is unavailable from local network, but it’s available from reachable_host’s network. This command creates a connection to unreachable_host through “hidden” connection to reachable_host.
7) Copy from host1 to host2, through your host
ssh root@host1 “cd /somedir/tocopy/ && tar -cf – .” | ssh root@host2 “cd /samedir/tocopyto/ && tar -xf -”
Good if you only have access to host1 and host2, but they have no access to your host (so ncat won’t work) and they have no direct access to each other.
8) Run any GUI program remotely
ssh -fX <user>@<host> <program>
The SSH server configuration requires:
X11Forwarding yes # this is default in Debian
And it’s convenient to use:
Compression delayed
9) Create a persistent connection to a machine
ssh -MNf <user>@<host>
Create a persistent SSH connection to the host in the background. Combine this with settings in your ~/.ssh/config:
Host host
ControlPath ~/.ssh/master-%r@%h:%p
ControlMaster no
All the SSH connections to the machine will then go through the persisten SSH socket. This is very useful if you are using SSH to synchronize files (using rsync/sftp/cvs/svn) on a regular basis because it won’t create a new socket each time to open an ssh connection.
10) Attach screen over ssh
ssh -t remote_host screen -r
Directly attach a remote screen session (saves a useless parent bash process)
11) Port Knocking!
knock <host> 3000 4000 5000 && ssh -p <port> user@host && knock <host> 5000 4000 3000
Knock on ports to open a port to a service (ssh for example) and knock again to close the port. You have to install knockd.
See example config file below.
[options]
logfile = /var/log/knockd.log
[openSSH]
sequence = 3000,4000,5000
seq_timeout = 5
command = /sbin/iptables -A INPUT -i eth0 -s %IP% -p tcp –dport 22 -j ACCEPT
tcpflags = syn
[closeSSH]
sequence = 5000,4000,3000
seq_timeout = 5
command = /sbin/iptables -D INPUT -i eth0 -s %IP% -p tcp –dport 22 -j ACCEPT
tcpflags = syn
12) Remove a line in a text file. Useful to fix
ssh-keygen -R <the_offending_host>
In this case it’s better do to use the dedicated tool
13) Run complex remote shell cmds over ssh, without escaping quotes
ssh host -l user $(<cmd.txt)
Much simpler method. More portable version: ssh host -l user “`cat cmd.txt`”
14) Copy a MySQL Database to a new Server via SSH with one command
mysqldump –add-drop-table –extended-insert –force –log-error=error.log -uUSER -pPASS OLD_DB_NAME | ssh -C user@newhost “mysql -uUSER -pPASS NEW_DB_NAME”
Dumps a MySQL database over a compressed SSH tunnel and uses it as input to mysql – i think that is the fastest and best way to migrate a DB to a new server!
15) Remove a line in a text file. Useful to fix “ssh host key change” warnings
sed -i 8d ~/.ssh/known_hosts
16) Copy your ssh public key to a server from a machine that doesn’t have ssh-copy-id
cat ~/.ssh/id_rsa.pub | ssh user@machine “mkdir ~/.ssh; cat >> ~/.ssh/authorized_keys”
If you use Mac OS X or some other *nix variant that doesn’t come with ssh-copy-id, this one-liner will allow you to add your public key to a remote machine so you can subsequently ssh to that machine without a password.
17) Live ssh network throughput test
yes | pv | ssh $host “cat > /dev/null”
connects to host via ssh and displays the live transfer speed, directing all transferred data to /dev/null
needs pv installed
Debian: ‘apt-get install pv’
Fedora: ‘yum install pv’ (may need the ‘extras’ repository enabled)
18) How to establish a remote Gnu screen session that you can re-connect to
ssh -t user@some.domain.com /usr/bin/screen -xRR
Long before tabbed terminals existed, people have been using Gnu screen to open many shells in a single text terminal. Combined with ssh, it gives you the ability to have many open shells with a single remote connection using the above options. If you detach with “Ctrl-a d” or if the ssh session is accidentally terminated, all processes running in your remote shells remain undisturbed, ready for you to reconnect. Other useful screen commands are “Ctrl-a c” (open new shell) and “Ctrl-a a” (alternate between shells). Read this quick reference for more screen commands: http://aperiodic.net/screen/quick_reference
19) Resume scp of a big file
rsync –partial –progress –rsh=ssh $file_source $user@$host:$destination_file
It can resume a failed secure copy ( usefull when you transfer big files like db dumps through vpn ) using rsync.
It requires rsync installed in both hosts.
rsync –partial –progress –rsh=ssh $file_source $user@$host:$destination_file local -> remote
or
rsync –partial –progress –rsh=ssh $user@$host:$remote_file $destination_file remote -> local
20) Analyze traffic remotely over ssh w/ wireshark
ssh root@server.com ‘tshark -f “port !22″ -w -’ | wireshark -k -i -
This captures traffic on a remote machine with tshark, sends the raw pcap data over the ssh link, and displays it in wireshark. Hitting ctrl+C will stop the capture and unfortunately close your wireshark window. This can be worked-around by passing -c # to tshark to only capture a certain # of packets, or redirecting the data through a named pipe rather than piping directly from ssh to wireshark. I recommend filtering as much as you can in the tshark command to conserve bandwidth. tshark can be replaced with tcpdump thusly:
ssh root@example.com tcpdump -w – ‘port !22′ | wireshark -k -i -
21) Have an ssh session open forever
autossh -M50000 -t server.example.com ‘screen -raAd mysession’
Open a ssh session opened forever, great on laptops losing Internet connectivity when switching WIFI spots.
22) Harder, Faster, Stronger SSH clients
ssh -4 -C -c blowfish-cbc
We force IPv4, compress the stream, specify the cypher stream to be Blowfish. I suppose you could use aes256-ctr as well for cypher spec. I’m of course leaving out things like master control sessions and such as that may not be available on your shell although that would speed things up as well.
23) Throttle bandwidth with cstream
tar -cj /backup | cstream -t 777k | ssh host ‘tar -xj -C /backup’
this bzips a folder and transfers it over the network to “host” at 777k bit/s.
cstream can do a lot more, have a look http://www.cons.org/cracauer/cstream.html#usage
for example:
echo w00t, i’m 733+ | cstream -b1 -t2
24) Transfer SSH public key to another machine in one step
ssh-keygen; ssh-copy-id user@host; ssh user@host
This command sequence allows simple setup of (gasp!) password-less SSH logins. Be careful, as if you already have an SSH keypair in your ~/.ssh directory on the local machine, there is a possibility ssh-keygen may overwrite them. ssh-copy-id copies the public key to the remote host and appends it to the remote account’s ~/.ssh/authorized_keys file. When trying ssh, if you used no passphrase for your key, the remote shell appears soon after invoking ssh user@host.
25) Copy stdin to your X11 buffer
ssh user@host cat /path/to/some/file | xclip
Have you ever had to scp a file to your work machine in order to copy its contents to a mail? xclip can help you with that. It copies its stdin to the X11 buffer, so all you have to do is middle-click to paste the content of that looong file :)
Have Fun
Thursday, November 25, 2010


Wednesday, October 27, 2010
Managing Samba (Part 6 of 6): Remote GUI tools
While there are many tasks that can be performed from a command line, we no longer live in the Dark Ages, back when there were no graphical user interfaces (GUIs). There are graphical tools that can be used to manage Samba across a large corporate network. This tip addresses that subject. Are you ready?
Where eagles soar
Explore remote management options, and you'll find that neither free nor commercial Windows network management tools suit all IT shops' needs. There are no silver bullets. If your goal is to find a universal network management tool that will permit you to meet all site needs, no matter what, the news is not too bright.
While your thoughts may have been to soar with the eagles, you may have to content yourself with a more mundane solution. On the other hand, if your objective is to find a tool that may save a little hassle and make it possible for you to delegate some tasks to departmental managers, there is some good news.
Basic management tools
The Samba PDC (primary domain controller) configuration that was used in the last tip is rather simple. It uses the tdbsam binary database in which to store the SambaSAMAccount information.
The tdbsam passdb backend is unsuitable for use with a backup domain controller (BDC). Unix user and group accounts must be resolvable either from the /etc/passwd and /etc/group system account files or via the name service switcher (NSS) facility.
The fact that tdbsam does not permit operation of the PDC with a BDC means that this back end is limited to those sites that either have few users or many potential users at one location. The largest site I know that uses the tdbsam back end has 4,500 users. This back end can be used where the network is multi-segmented, but then fast WAN bandwidth is essential; otherwise, the infrastructure would collapse as a result of network logon failures.
With these provisos out of the way, let's consider remote network administration needs. Where this type of network configuration is in use, the most likely need is to permit delegation of the ability to join workstations to the network as well as user and group accounts. If care and attention is given to the design of file storage layout, it may not be necessary for departmental or divisional managers to create, delete or change share configurations.
In this situation, the Windows NT4 Domain User Manager will most likely be a sufficient tool for remote network management of users and groups. The NT4 Domain Server Manager, or the MMC Computer Management Console, could be used to administer shares and computers.
The NT4 Domain User Manager
In Figure 1, the Domain User Manager could be used to make Alex Monteiro a member of an additional group. It can also be used to change the primary group he belongs to. This is an example of a user account change.
Figure 1: Changing group membership

Figure 2 demonstrates the ability, using the NT4 Domain User Manager, to change the users who are members of a particular group.
Figure 2: Manipulation of group membership

It is increasingly necessary to limit user network access times and days. Figure 3 illustrates the capability to do this using the Windows NT4 Domain User Manager. This screen is accessed by clicking on the user account that must be managed.
Figure 3: Setting network access time limits

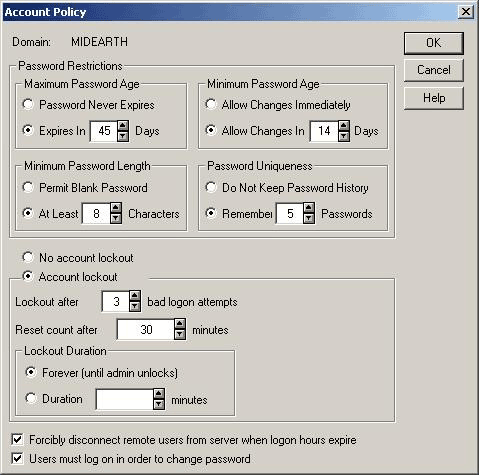
Domain access policies can also be set using the NT4 Domain User Manager. An example of policy setting is shown in Figure 4.
Figure 4: Domain access policy setting

Using the NT4 Domain Server Manager
The NT4 Domain Server Manager can be used to manage domain computer accounts, access controls on shares (share level ACLs) and to create shares. The example shown in Figure 5 demonstrates the settings of share level ACLs. In NT4, this is referred to as the setting of Share Permissions. The Share Permissions configuration acts as a filter that controls who can connect to the share. This ACL information is stored in the Samba file /var/lib/samba/share_info.tdb; it is not set in the smb.conf file.
Figure 5: Managing Share Permissions (ACLs)

A share can also be created using this tool. For that operation to work, the smb.conf file must define the script that should be called to add, change or delete a share. Example scripts are provided in the Samba source code tarball in the examples/scripts/share directory.
Figure 6 demonstrates the use of the NT4 Server Manager tool to create a new share. The example scripts that are included with Samba-3 DO NOT automatically create the new directory; that is a responsibility the administrator must take care of either before or after creating the share.
Figure 6: Adding a new share

The Windows XP MMC Computer Management Console
The Windows 2000/XP Professional MMC Computer Management Console can be used to manage share level ACLs as well as file system permission settings. This use of this tool to create a new share is shown in Figure 7.
Figure 7: Use of the MMC Console to create a new share

In Figures 6 and 7, it should be noted that the Samba UNIX path must be entered using Windows file system semantics. The path c:\data\archive\ will be automatically converted to the Unix semantics /data/archive/.
So far, it has been demonstrated that a Samba domain can be managed using the NT4 Domain User Manager and the NT4 Domain Server Manager. At this time, it is necessary to point out that these tools have their limitations when used from Windows 2000 or Windows XP Professional. That limitation is brought about because Microsoft has changed the underlying remote procedure call architecture in these products so that these tools can no longer be used to manage user rights and privileges from the later generation Windows platforms.
The NT4 Domain Management tools can be obtained from Microsoft's Web site. Just search for SRVTOOLS.EXE, download them and execute the file in the directory in which you want them to be installed.
There exists an equivalent tool called the Nessus Toolkit that can be installed on a Windows 9x/Me client. This tool can be used to manage all settings including user rights and privileges.
The NT4 Domain User Manager and the NT4 Domain Server Manager can be used, regardless of the passdb backend that Samba is using. However, sites that are using an LDAP directory to store and manage network users and groups will almost certainly desire an LDAP directory management tools that more succinctly manages the LDAP directory.
Administrative tool preferences are particularly personal. I have met administrators who prefer to use Webmin to manage the Samba configuration, user and group management.
There do not seem to be many today who make use of Samba's SWAT (Samba Web Administration Tool). SWAT was originally developed for the Samba-2 series.
LDAP Directory Managers
Just mentioning an LDAP directory browser is often enough to evoke a reaction. That is really just too bad, because directory browsers serve a very useful purpose, particularly for those who have a profound appreciation for the power they offer. Admittedly, not all LDAP browsers are created equally!
You may wish to check out the full range of open source offerings, or you may simply prefer to purchase a commercial tool set; the choice is yours. The following are LDAP directory browsing tools I find useful:
Name Source URL OS Platform Language
LDAP Browser http://www-unix.mcs.anl.gov/~gawor/ldap/download.html Any Java
LDAP Admin http://ldapadmin.sourceforge.net/ Win32 Native EXE
phpldapadmin http://phpldapadmin.sourceforge.net/ Web server PHP
Directory Administrator http://diradmin.open-it.org/ Linux + BSD C
GQ http://sourceforge.net/projects/gqclient Linux + BSD C
Of the above, it would appear that GQ and Directory Administrator are no longer actively maintained. GQ is current in its architecture, but Directory Administrator does not fully support recent releases of OpenLDAP. The other tools are currently active projects.
There are many other choices in LDAP directory browsers. But as useful as they are to the administrator who manages LDAP directories that span a complex array of services and purposes, the use of a more work-flow or task-oriented tool is often preferred.
There are three tools that outshine the rest where it pertains to managing a Samba-3+ LDAP environment:
Name Source URL OS Platform Language
LAM (LDAP Account Manager) http://lam.sourceforge.net/ Web server PHP
IMC (Idealx Management Console) http://imc.sourceforge.net/ Web server Perl
The LDAP Browser can be used to view and edit directory information, as is shown in Figure 8. The LDAP Browser lacks the facility to perform standard account operations without exposing information that a human resources manager or a departmental head would not need to know.
Figure 8: LDAP Browser showing a user account

Compared to the LDAP Browser, the LDAP Admin tool for MS Windows skillfully bridges both worlds. It looks and feels like LDAP Browser, but has added utilities that are more task-focused. Figure 9 provides a basic overview of what this tool looks like; but in Figure 10 you can see how it adds the nice touch of removing the complexity of having to deal with specific LDAP entities when adding a user account. It has this same smart touch for all management tasks.
Figure 9: LDAP admin basic view

Figure 10: LDAP admin create new user account

Although these tools look neat, they are oriented towards the more technically-competent directory administrator. There are a few tools that are designed to remove the appearance of being for the LDAP guru and that have a stronger task orientation. One example is LAM, the LDAP Account Manager. An example showing a partial list of users is given in Figure 11.
Figure 11: LDAP account manager user list

On the other hand, if you are using Samba-3 + LDAP, and have chosen to use the Idealx smbldap, Perl-based scripts, to permit Samba to interface to with the LDAP directory, you may choose to use the Idealx Management Console with the SambaConsole plug-in. Figure 12 presents a typical IMC console.
Figure 12: IMC user account console

Commercial utilities
It is good to see the number of companies that are providing tools and utilities to ease and facilitate the deployment and management of Samba-3. If your interest is in finding commercially-supported and/or commercial tools, check the Samba Website's vendors section and the GUI section.
Looking for more tools of convenience? Check out the following Web sites: QCD Interstructures; Vintela; and Centeris.
Conclusion
A detailed overview has been provided demonstrating how Samba-3 can form part of a fully integrated network management infrastructure. The series of articles now completed has shown how Samba-3 user and groups and Windows clients can be fully integrated. The documentation explained how security identifiers are handled across the disparate platforms, how user rights and privileges are implemented using Samba-3, the use of basic command-line management and configuration tools, how to create a basic smb.conf file for a PDC and how it is possible to manage the whole show using some simple as well as sophisticated GUI tools. Enjoy!
Where eagles soar
Explore remote management options, and you'll find that neither free nor commercial Windows network management tools suit all IT shops' needs. There are no silver bullets. If your goal is to find a universal network management tool that will permit you to meet all site needs, no matter what, the news is not too bright.
While your thoughts may have been to soar with the eagles, you may have to content yourself with a more mundane solution. On the other hand, if your objective is to find a tool that may save a little hassle and make it possible for you to delegate some tasks to departmental managers, there is some good news.
Basic management tools
The Samba PDC (primary domain controller) configuration that was used in the last tip is rather simple. It uses the tdbsam binary database in which to store the SambaSAMAccount information.
The tdbsam passdb backend is unsuitable for use with a backup domain controller (BDC). Unix user and group accounts must be resolvable either from the /etc/passwd and /etc/group system account files or via the name service switcher (NSS) facility.
The fact that tdbsam does not permit operation of the PDC with a BDC means that this back end is limited to those sites that either have few users or many potential users at one location. The largest site I know that uses the tdbsam back end has 4,500 users. This back end can be used where the network is multi-segmented, but then fast WAN bandwidth is essential; otherwise, the infrastructure would collapse as a result of network logon failures.
With these provisos out of the way, let's consider remote network administration needs. Where this type of network configuration is in use, the most likely need is to permit delegation of the ability to join workstations to the network as well as user and group accounts. If care and attention is given to the design of file storage layout, it may not be necessary for departmental or divisional managers to create, delete or change share configurations.
In this situation, the Windows NT4 Domain User Manager will most likely be a sufficient tool for remote network management of users and groups. The NT4 Domain Server Manager, or the MMC Computer Management Console, could be used to administer shares and computers.
The NT4 Domain User Manager
In Figure 1, the Domain User Manager could be used to make Alex Monteiro a member of an additional group. It can also be used to change the primary group he belongs to. This is an example of a user account change.
Figure 1: Changing group membership

Figure 2 demonstrates the ability, using the NT4 Domain User Manager, to change the users who are members of a particular group.
Figure 2: Manipulation of group membership

It is increasingly necessary to limit user network access times and days. Figure 3 illustrates the capability to do this using the Windows NT4 Domain User Manager. This screen is accessed by clicking on the user account that must be managed.
Figure 3: Setting network access time limits

Domain access policies can also be set using the NT4 Domain User Manager. An example of policy setting is shown in Figure 4.
Figure 4: Domain access policy setting
Using the NT4 Domain Server Manager
The NT4 Domain Server Manager can be used to manage domain computer accounts, access controls on shares (share level ACLs) and to create shares. The example shown in Figure 5 demonstrates the settings of share level ACLs. In NT4, this is referred to as the setting of Share Permissions. The Share Permissions configuration acts as a filter that controls who can connect to the share. This ACL information is stored in the Samba file /var/lib/samba/share_info.tdb; it is not set in the smb.conf file.
Figure 5: Managing Share Permissions (ACLs)

A share can also be created using this tool. For that operation to work, the smb.conf file must define the script that should be called to add, change or delete a share. Example scripts are provided in the Samba source code tarball in the examples/scripts/share directory.
Figure 6 demonstrates the use of the NT4 Server Manager tool to create a new share. The example scripts that are included with Samba-3 DO NOT automatically create the new directory; that is a responsibility the administrator must take care of either before or after creating the share.
Figure 6: Adding a new share

The Windows XP MMC Computer Management Console
The Windows 2000/XP Professional MMC Computer Management Console can be used to manage share level ACLs as well as file system permission settings. This use of this tool to create a new share is shown in Figure 7.
Figure 7: Use of the MMC Console to create a new share

In Figures 6 and 7, it should be noted that the Samba UNIX path must be entered using Windows file system semantics. The path c:\data\archive\ will be automatically converted to the Unix semantics /data/archive/.
So far, it has been demonstrated that a Samba domain can be managed using the NT4 Domain User Manager and the NT4 Domain Server Manager. At this time, it is necessary to point out that these tools have their limitations when used from Windows 2000 or Windows XP Professional. That limitation is brought about because Microsoft has changed the underlying remote procedure call architecture in these products so that these tools can no longer be used to manage user rights and privileges from the later generation Windows platforms.
The NT4 Domain Management tools can be obtained from Microsoft's Web site. Just search for SRVTOOLS.EXE, download them and execute the file in the directory in which you want them to be installed.
There exists an equivalent tool called the Nessus Toolkit that can be installed on a Windows 9x/Me client. This tool can be used to manage all settings including user rights and privileges.
The NT4 Domain User Manager and the NT4 Domain Server Manager can be used, regardless of the passdb backend that Samba is using. However, sites that are using an LDAP directory to store and manage network users and groups will almost certainly desire an LDAP directory management tools that more succinctly manages the LDAP directory.
Administrative tool preferences are particularly personal. I have met administrators who prefer to use Webmin to manage the Samba configuration, user and group management.
There do not seem to be many today who make use of Samba's SWAT (Samba Web Administration Tool). SWAT was originally developed for the Samba-2 series.
LDAP Directory Managers
Just mentioning an LDAP directory browser is often enough to evoke a reaction. That is really just too bad, because directory browsers serve a very useful purpose, particularly for those who have a profound appreciation for the power they offer. Admittedly, not all LDAP browsers are created equally!
You may wish to check out the full range of open source offerings, or you may simply prefer to purchase a commercial tool set; the choice is yours. The following are LDAP directory browsing tools I find useful:
Name Source URL OS Platform Language
LDAP Browser http://www-unix.mcs.anl.gov/~gawor/ldap/download.html Any Java
LDAP Admin http://ldapadmin.sourceforge.net/ Win32 Native EXE
phpldapadmin http://phpldapadmin.sourceforge.net/ Web server PHP
Directory Administrator http://diradmin.open-it.org/ Linux + BSD C
GQ http://sourceforge.net/projects/gqclient Linux + BSD C
Of the above, it would appear that GQ and Directory Administrator are no longer actively maintained. GQ is current in its architecture, but Directory Administrator does not fully support recent releases of OpenLDAP. The other tools are currently active projects.
There are many other choices in LDAP directory browsers. But as useful as they are to the administrator who manages LDAP directories that span a complex array of services and purposes, the use of a more work-flow or task-oriented tool is often preferred.
There are three tools that outshine the rest where it pertains to managing a Samba-3+ LDAP environment:
Name Source URL OS Platform Language
LAM (LDAP Account Manager) http://lam.sourceforge.net/ Web server PHP
IMC (Idealx Management Console) http://imc.sourceforge.net/ Web server Perl
The LDAP Browser can be used to view and edit directory information, as is shown in Figure 8. The LDAP Browser lacks the facility to perform standard account operations without exposing information that a human resources manager or a departmental head would not need to know.
Figure 8: LDAP Browser showing a user account

Compared to the LDAP Browser, the LDAP Admin tool for MS Windows skillfully bridges both worlds. It looks and feels like LDAP Browser, but has added utilities that are more task-focused. Figure 9 provides a basic overview of what this tool looks like; but in Figure 10 you can see how it adds the nice touch of removing the complexity of having to deal with specific LDAP entities when adding a user account. It has this same smart touch for all management tasks.
Figure 9: LDAP admin basic view

Figure 10: LDAP admin create new user account

Although these tools look neat, they are oriented towards the more technically-competent directory administrator. There are a few tools that are designed to remove the appearance of being for the LDAP guru and that have a stronger task orientation. One example is LAM, the LDAP Account Manager. An example showing a partial list of users is given in Figure 11.
Figure 11: LDAP account manager user list

On the other hand, if you are using Samba-3 + LDAP, and have chosen to use the Idealx smbldap, Perl-based scripts, to permit Samba to interface to with the LDAP directory, you may choose to use the Idealx Management Console with the SambaConsole plug-in. Figure 12 presents a typical IMC console.
Figure 12: IMC user account console

Commercial utilities
It is good to see the number of companies that are providing tools and utilities to ease and facilitate the deployment and management of Samba-3. If your interest is in finding commercially-supported and/or commercial tools, check the Samba Website's vendors section and the GUI section.
Looking for more tools of convenience? Check out the following Web sites: QCD Interstructures; Vintela; and Centeris.
Conclusion
A detailed overview has been provided demonstrating how Samba-3 can form part of a fully integrated network management infrastructure. The series of articles now completed has shown how Samba-3 user and groups and Windows clients can be fully integrated. The documentation explained how security identifiers are handled across the disparate platforms, how user rights and privileges are implemented using Samba-3, the use of basic command-line management and configuration tools, how to create a basic smb.conf file for a PDC and how it is possible to manage the whole show using some simple as well as sophisticated GUI tools. Enjoy!
Managing Samba (Part 5 of 6): Configuration with the net utility, part two
In part one of this Samba-3 Management tip, we prepared for the big act. Now, the excitement begins. We're ready to use the net utility in the final steps in configuration of the primary domain controller.
Up to this point, no user account has been granted Windows network administrative rights and privileges. Our objective is to give the account mstone full administrative rights. This is simply achieved by making mstone a member of the Linux managersgroup. The managers group is mapped to the Windows Domain Admins group. However, life is not that simple. By default, the Domain Admin group has not rights other than to assign rights and privileges. This means that specific privileges must be assigned even to the Domain Admins group.
Create an administrative user account
Let's verify that mstone is a member of the managers group within the Linux environment:
root#> id mstone
uid=1001(mstone) gid=100(users) groups=100(users),1001(managers)
Now we must demonstrate that within Samba mstone is a member of the Domain Admins group:
root#> net rpc group members "Domain Admins" -S violetsblue -Umstone%n3v3r2l8
ROSESARERED\mstone
Good, mstone is a member of the Windows Domain Admins group. This is achieved by way of the mapping we established by executing:
root#> net groupmap modify ntgroup="Domain Admins" unixgroup=managers
Assign rights and privileges to the domain admins group
In this step, the Domain Admins group is assigned (given, or granted) all administrative rights:
root#> net rpc rights grant "Domain Admins" \
SeMachineAccountPrivilege \
SeTakeOwnershipPrivilege \
SeBackupPrivilege \
SeRestorePrivilege \
SeRemoteShutdownPrivilege \
SePrintOperatorPrivilege \
SeAddUsersPrivilege \
SeDiskOperatorPrivilege -S violetsblue -Umstone%n3v3r2l8
Successfully granted rights.
Make the PDC a domain member
The next step is to make our PDC a member of its own domain. This step requires domain administrative privilege which mstone has. Execute the following:
root#> net rpc join -Umstone%n3v3r2l8
Joined domain ROSESARERED
It is a good practice to validate every step, as we have done so far. The domain trust account that was created by joining the domain can appear to proceed correctly, but it may not work. This can be checked simply by executing:
root#> net rpc testjoin
Join to 'ROSESARERED' is OK
Let's run a further check to see obtain the status of the domain environment:
root#> net rpc info -S violetsblue
Domain Name: ROSESARERED
Domain SID: S-1-5-21-3169455399-2908770435-3209857667
Sequence number: 1135058837
Num users: 2
Num domain groups: 4
Num local groups: 0
So far, so good!
Create additional users
So far, the net command has been used to:
In the last step, we confirmed that there are only two Windows user accounts and four Windows group accounts.
Let's add accounts for the users misty, jable, dstornton using the remote management net tool:
root#> net rpc user add misty -S violetsblue -Umstone%n3v3r2l8
root#> net rpc user add jable -S violetsblue -Umstone%n3v3r2l8
root#> net rpc user add dstornton -S violetsblue -Umstone%n3v3r2l8
The use of the net rpc group add facility results in Samba calling the add user script to add the account to the Linux account database (/etc/passwd), followed by addition to the passdb backend (tdbsam) specified in the smb.conf file.
Unfortunately, these accounts do not yet have a password. We must rectify that at once:
root#> net rpc password misty secretpw1 -S violetsblue -Umstone%n3v3r2l8
root#> net rpc password jable secretpw2 -S violetsblue -Umstone%n3v3r2l8
root#> net rpc password dstornton secretpw3 -S violetsblue -Umstone%n3v3r2l8
If the password secretpw1 is not added to the command line, this tool will prompt for the password to be entered. It looks like this:
root#> net rpc password misty -S violetsblue -Umstone%n3v3r2l8
Enter new password for misty: XXXXXXXX
Now let's add misty to the group scientists:
root#> net rpc group addmem scientists misty -S violetsblue -Umstone%n3v3r2l8
It is possible to add the other new members. We can add a new group called warriors by executing this command:
root#> net rpc group add warriors -S violetsblue -Umstone%n3v3r2l8
Let's add misty so she will be a member of the new warriors group:
root#> net rpc group addmem warriors misty -S violetsblue -Umstone%n3v3r2l8
To remove misty from the warriors group, just use the delmem operator, as shown here:
root#> net rpc group delmem warriors misty -S violetsblue -Umstone%n3v3r2l8
Assign user rights
Often, it is necessary to give a user certain limited administrative privileges. An example is making it possible for a normal user to manage printing operations. In this case misty is assigned the printer management capabilities:
root#> net rpc rights grant "ROSESARERED\misty" SePrintOperatorPrivilege \
-S violetsblue -Umstone%n3v3r2l8
Assigned rights can be examined as shown here:
root#> net rpc rights list accounts -S violetsblue -Umstone%n3v3r2l8
BUILTIN\Print Operators
No privileges assigned
BUILTIN\Account Operators
No privileges assigned
ROSESARERED\Domain Admins
SeMachineAccountPrivilege
SeTakeOwnershipPrivilege
SeBackupPrivilege
SeRestorePrivilege
SeRemoteShutdownPrivilege
SePrintOperatorPrivilege
SeAddUsersPrivilege
SeDiskOperatorPrivilege
BUILTIN\Backup Operators
No privileges assigned
BUILTIN\Server Operators
No privileges assigned
ROSESARERED\misty
SePrintOperatorPrivilege
BUILTIN\Administrators
No privileges assigned
Everyone
No privileges assigned
Wrapping up
The net utility permits very extensive remote management of a Samba server. So far, I have demonstrated how this tool can be used to join a Samba server to its domain, add/delete/change user and group accounts, map Linux groups to Windows groups, add users to groups, and so on. The use of this tool to assign rights and privileges has also been briefly touched upon.
The use of this command is well documented in The Official Samba-3 HOWTO and Reference Guide in chapter 12. The latest version of this document is available from Samba.org. This document is also available from Amazon.com in hard copy under ISBN No: 0131882228.
The series continues
This is the fifth article in my Managing Samba series. Articles in this series have so far explained:
The next article will deal with remote GUI management tools and facilities. It will review various GUI tools that can be used to facilitate network management. Of course, some will quickly point out that if this can be made simple enough, it should be possible to delegate many day-to-day operations to senior user staff and thus reduce the cost of keeping the network operational.
Up to this point, no user account has been granted Windows network administrative rights and privileges. Our objective is to give the account mstone full administrative rights. This is simply achieved by making mstone a member of the Linux managersgroup. The managers group is mapped to the Windows Domain Admins group. However, life is not that simple. By default, the Domain Admin group has not rights other than to assign rights and privileges. This means that specific privileges must be assigned even to the Domain Admins group.
Create an administrative user account
Let's verify that mstone is a member of the managers group within the Linux environment:
root#> id mstone
uid=1001(mstone) gid=100(users) groups=100(users),1001(managers)
Now we must demonstrate that within Samba mstone is a member of the Domain Admins group:
root#> net rpc group members "Domain Admins" -S violetsblue -Umstone%n3v3r2l8
ROSESARERED\mstone
Good, mstone is a member of the Windows Domain Admins group. This is achieved by way of the mapping we established by executing:
root#> net groupmap modify ntgroup="Domain Admins" unixgroup=managers
Assign rights and privileges to the domain admins group
In this step, the Domain Admins group is assigned (given, or granted) all administrative rights:
root#> net rpc rights grant "Domain Admins" \
SeMachineAccountPrivilege \
SeTakeOwnershipPrivilege \
SeBackupPrivilege \
SeRestorePrivilege \
SeRemoteShutdownPrivilege \
SePrintOperatorPrivilege \
SeAddUsersPrivilege \
SeDiskOperatorPrivilege -S violetsblue -Umstone%n3v3r2l8
Successfully granted rights.
Make the PDC a domain member
The next step is to make our PDC a member of its own domain. This step requires domain administrative privilege which mstone has. Execute the following:
root#> net rpc join -Umstone%n3v3r2l8
Joined domain ROSESARERED
It is a good practice to validate every step, as we have done so far. The domain trust account that was created by joining the domain can appear to proceed correctly, but it may not work. This can be checked simply by executing:
root#> net rpc testjoin
Join to 'ROSESARERED' is OK
Let's run a further check to see obtain the status of the domain environment:
root#> net rpc info -S violetsblue
Domain Name: ROSESARERED
Domain SID: S-1-5-21-3169455399-2908770435-3209857667
Sequence number: 1135058837
Num users: 2
Num domain groups: 4
Num local groups: 0
So far, so good!
Create additional users
So far, the net command has been used to:
- map Linux groups to Windows groups;
- check Windows group membership;
- join the PDC to its own domain;
- validate the domain account (join); and,
- check domain information (note: not dependent on the join).
In the last step, we confirmed that there are only two Windows user accounts and four Windows group accounts.
Let's add accounts for the users misty, jable, dstornton using the remote management net tool:
root#> net rpc user add misty -S violetsblue -Umstone%n3v3r2l8
root#> net rpc user add jable -S violetsblue -Umstone%n3v3r2l8
root#> net rpc user add dstornton -S violetsblue -Umstone%n3v3r2l8
The use of the net rpc group add facility results in Samba calling the add user script to add the account to the Linux account database (/etc/passwd), followed by addition to the passdb backend (tdbsam) specified in the smb.conf file.
Unfortunately, these accounts do not yet have a password. We must rectify that at once:
root#> net rpc password misty secretpw1 -S violetsblue -Umstone%n3v3r2l8
root#> net rpc password jable secretpw2 -S violetsblue -Umstone%n3v3r2l8
root#> net rpc password dstornton secretpw3 -S violetsblue -Umstone%n3v3r2l8
If the password secretpw1 is not added to the command line, this tool will prompt for the password to be entered. It looks like this:
root#> net rpc password misty -S violetsblue -Umstone%n3v3r2l8
Enter new password for misty: XXXXXXXX
Now let's add misty to the group scientists:
root#> net rpc group addmem scientists misty -S violetsblue -Umstone%n3v3r2l8
It is possible to add the other new members. We can add a new group called warriors by executing this command:
root#> net rpc group add warriors -S violetsblue -Umstone%n3v3r2l8
Let's add misty so she will be a member of the new warriors group:
root#> net rpc group addmem warriors misty -S violetsblue -Umstone%n3v3r2l8
To remove misty from the warriors group, just use the delmem operator, as shown here:
root#> net rpc group delmem warriors misty -S violetsblue -Umstone%n3v3r2l8
Assign user rights
Often, it is necessary to give a user certain limited administrative privileges. An example is making it possible for a normal user to manage printing operations. In this case misty is assigned the printer management capabilities:
root#> net rpc rights grant "ROSESARERED\misty" SePrintOperatorPrivilege \
-S violetsblue -Umstone%n3v3r2l8
Assigned rights can be examined as shown here:
root#> net rpc rights list accounts -S violetsblue -Umstone%n3v3r2l8
BUILTIN\Print Operators
No privileges assigned
BUILTIN\Account Operators
No privileges assigned
ROSESARERED\Domain Admins
SeMachineAccountPrivilege
SeTakeOwnershipPrivilege
SeBackupPrivilege
SeRestorePrivilege
SeRemoteShutdownPrivilege
SePrintOperatorPrivilege
SeAddUsersPrivilege
SeDiskOperatorPrivilege
BUILTIN\Backup Operators
No privileges assigned
BUILTIN\Server Operators
No privileges assigned
ROSESARERED\misty
SePrintOperatorPrivilege
BUILTIN\Administrators
No privileges assigned
Everyone
No privileges assigned
Wrapping up
The net utility permits very extensive remote management of a Samba server. So far, I have demonstrated how this tool can be used to join a Samba server to its domain, add/delete/change user and group accounts, map Linux groups to Windows groups, add users to groups, and so on. The use of this tool to assign rights and privileges has also been briefly touched upon.
The use of this command is well documented in The Official Samba-3 HOWTO and Reference Guide in chapter 12. The latest version of this document is available from Samba.org. This document is also available from Amazon.com in hard copy under ISBN No: 0131882228.
The series continues
This is the fifth article in my Managing Samba series. Articles in this series have so far explained:
- Windows network identity basics and their use in Samba-3;
- Windows NT/200x user rights and privileges in Samba 3.0.11 and later;
- Domain control parameters and operating system interface scripts in the Samba smb.conf file.
- The pdbedit utility to manage domain and user account policy settings.
The next article will deal with remote GUI management tools and facilities. It will review various GUI tools that can be used to facilitate network management. Of course, some will quickly point out that if this can be made simple enough, it should be possible to delegate many day-to-day operations to senior user staff and thus reduce the cost of keeping the network operational.
Subscribe to:
Posts (Atom)