The net utility plays a key role in completing the configuration of a Samba-3 domain controller or activating and managing a Samba-3 domain member server.
This tip discusses the practical use of the net command. It can be used for initial configuration as well as for on-going system maintenance of Samba-3 domain security environments. My key objective is to demonstrate the assignment and use of network administration tasks using a non-root account. This capability was first available with Samba-3.0.11 and is surely ready for prime-time use. The examples shown here provide the key to safe deployment of Samba using samba-3.0.21.
Pre-flight check
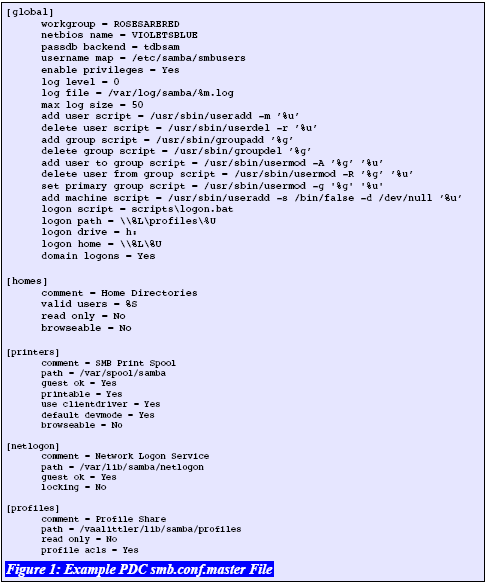
Before launching into the use of the net utility, it is best to quickly check that you have installed a valid smb.conf.master file. A modified version of the file I used previously is shown in Figure 1. This file can be converted into the operational smb.conf file by executing:
root#> testparm -s smb.conf.master > /etc/samba/smb.conf
Always check the validity of the file before starting Samba. The recommended way to do this is by executing:
root#> testparm
Load smb config files from /etc/samba/smb.conf
Processing section "[homes]"
Processing section "[printers]"
Processing section "[netlogon]"
Processing section "[profiles]"
Loaded services file OK.
Server role: ROLE_DOMAIN_PDC
Press enter to see a dump of your service definitions
...
Before starting Samba, it is a good idea to check that there are no tdb files on the system and that may be a left-over from a previous execution of the smbd and nmbd deamons.
Samba-3 will create tdb files in the following directories:
Red Hat Linux: /etc/samba, /var/cache/samba
Never remove the tdb files from a working Samba server unless you really do know what you are doing. The /etc/samba/secrets.tdb file contains essential security data that includes the domain SID. The /etc/samba/passdb.tdb file contains the SambaSAMAccount information. Our example network uses the passdb backend = tdbsam method of storing Windows network account information.
You can remove old Samba run-time files after first stopping the nmbd and smbd daemons by executing:
Red Hat Linux:
root#> service smb stop && service nmb stop
root#> rm /etc/samba/*tdb /var/cache/samba/*
Start the Samba smbd and nmbd daemons using the appropriate method for your Linux platform. On a Red Hat Linux execute:
root#> service nmb start && service smb start
Sites that use an LDAP directory to store all account information require more detailed configurations that are beyond the scope of this article series; however, the net command can be used in the same manner as is described below. This tool is independent of the account back end and simply calls the scripts that are specified in the smb.conf file for all host environment dependent operations.
There are yet a few more things that must be completed before your start can move on. The objective of this series of tips is to end up with a working Samba domain controller. This requires the creation of user and group accounts on the PDC. There are two sides to these accounts: the Linux system account; and the SambaSAMAccount.
The first article in this series described the relationship between the system account and the Windows networking accounts (or SambaSAMAccounts).
The last tip in this series, which covered pdbedit, stepped through the account creation process. If you followed each step, your system should now have a number of Linux user and group accounts, each of which has been configured to have an equivalent Windows networking account.
So that all steps are covered in this tip, I will briefly, and without explanation, create the accounts that are necessary for the use of the net command. The steps that are necessary for this are shown in Figure 2.
Note: Some Linux distributions do not permit addition of a user (machine) account with the home directory specified as /dev/null. If your platform is one of these it will be necessary to change the add machine script parameter in the smb.conf file to use a permitted value.
All right! You've laid the foundation. Now, in part two of this tip, we'll get down to the final steps in configuration of the primary domain controller.
Wednesday, October 27, 2010
Subscribe to:
Post Comments (Atom)


No comments:
Post a Comment